Table of Contents
ToggleManaging your availability in the workplace is crucial, especially when you’re planning to be out of the office. Setting up an “Out of Office” (OOO) message in Outlook Calendar ensures that your colleagues and clients are informed of your absence and helps maintain smooth communication in your absence. This guide will walk you through the steps to set up an Out of Office message in Microsoft Outlook, covering both the classic desktop application and Outlook on the web.
1. Why Setting Up an Out of Office in Outlook is Important
Before diving into the steps, let’s briefly discuss why setting up an OOO message is essential:
- Professionalism: It ensures that anyone trying to reach you is aware of your absence and knows when you will return.
- Efficient Communication: Colleagues can plan their tasks accordingly, and clients or external contacts can know whom to reach out to during your absence.
- Work-Life Balance: It sets boundaries, letting people know that you are not available during certain periods.
2. Setting Up Out of Office in Outlook Desktop
Step 1: Open Outlook and Navigate to Your Calendar
- Launch Outlook: Begin by opening the Microsoft Outlook application on your computer. This is typically done by clicking the Outlook icon on your desktop, taskbar, or start menu.
- Access the Calendar: Once Outlook is open, locate the Calendar icon at the bottom left-hand corner of the window. Clicking this icon switches your view from your email inbox to your calendar, where you can manage your schedule and appointments.
Step 2: Create a New Calendar Event
- Select the Dates: In the calendar view, select the date or range of dates that you will be out of the office. You can do this by clicking on a single date or by clicking and dragging across multiple dates if your absence spans several days.
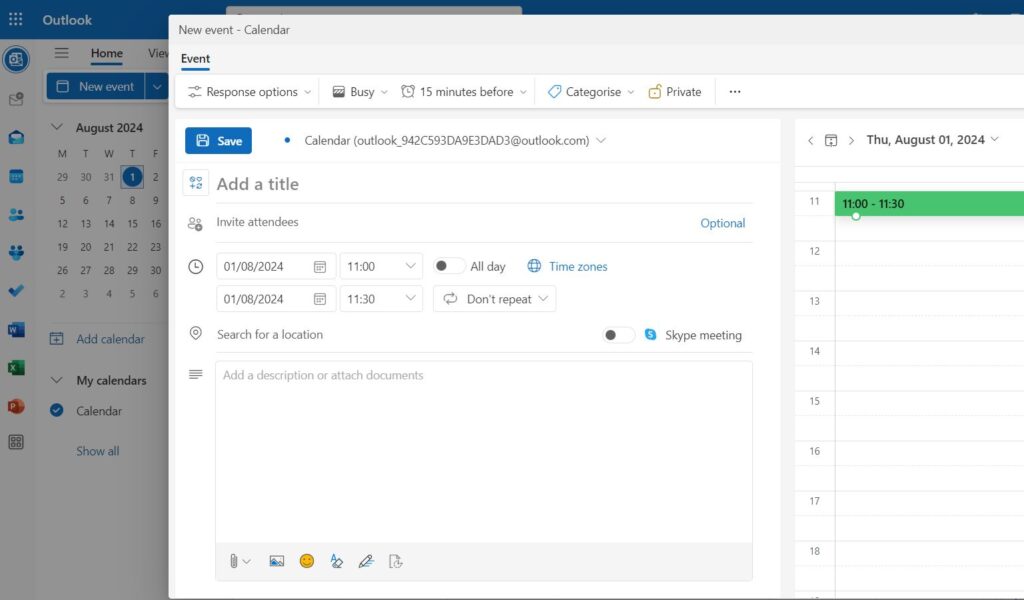
- New Event Window: After selecting your desired dates, a new event window will automatically open. This is where you will enter all the necessary details about your out-of-office status.

The Third Step: Set the Event as “Out of Office”
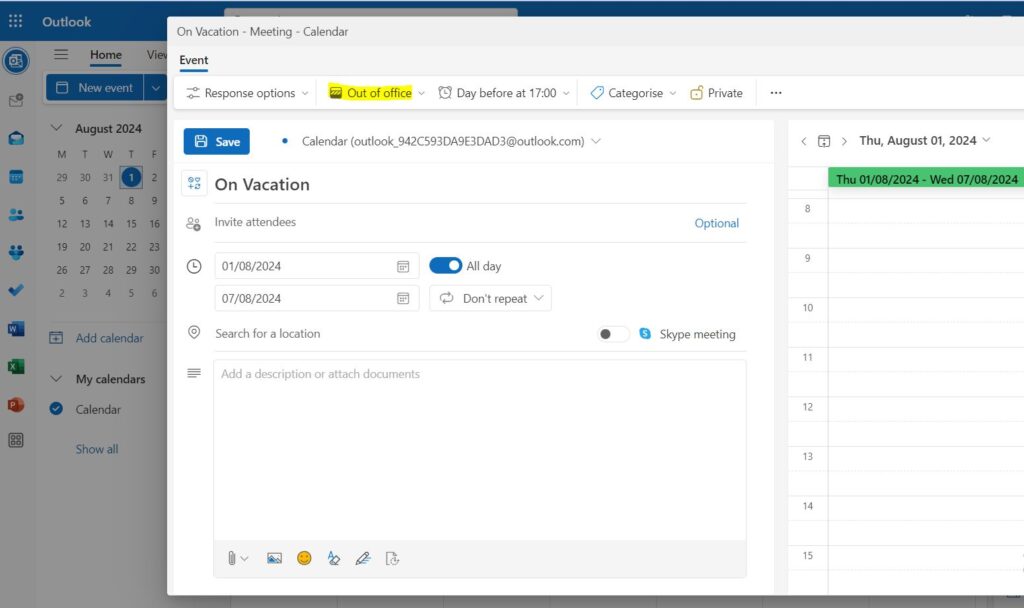
- Availability Status: In the new event window, locate the drop-down menu labeled “Show As.” This menu is typically found under the start and end times of the event.
- Select “Out of Office”: Click on this drop-down menu and select Out of Office from the options. This setting is important because it updates your availability status in Outlook, showing others who view your calendar that you are not available during this period. It also automatically changes your calendar color for these dates, visually indicating that you’re out of office.
The Fourth Step: Customize the Event Details
- Event Title: In the event title field, enter a clear and descriptive title, such as “Out of Office,” “Vacation,” or “Business Trip.” This title will appear on your calendar and in any invites you send, making it immediately clear why you’re unavailable.
- Start and End Time: Ensure the start and end times reflect the precise period of your absence. This could be for a few hours, a full day, or several days, depending on your needs. Double-check these times to avoid any confusion.
- All-Day Event Option: If you will be unavailable for an entire day or multiple days, consider selecting the All Day checkbox. This is especially useful for multi-day trips or vacations, as it marks your calendar for the entire duration.
- Location Field: The location field is optional but can be helpful. You might leave it blank or enter a location relevant to your absence, such as “On Vacation” or “At Conference.” This provides additional context for those viewing your calendar.

Step 5: Add a Message
- Event Body: In the body of the event, you can include a custom message that further clarifies your availability. This could be something like, “I will be out of the office from [start date] to [end date] and will have limited access to email. For urgent matters, please contact [alternative contact name].”
- Additional Information: If there are specific tasks or responsibilities that need attention while you’re away, you can include instructions or delegate tasks to colleagues in this section. This ensures nothing falls through the cracks during your absence.
Step 6: Set Up Automatic Replies
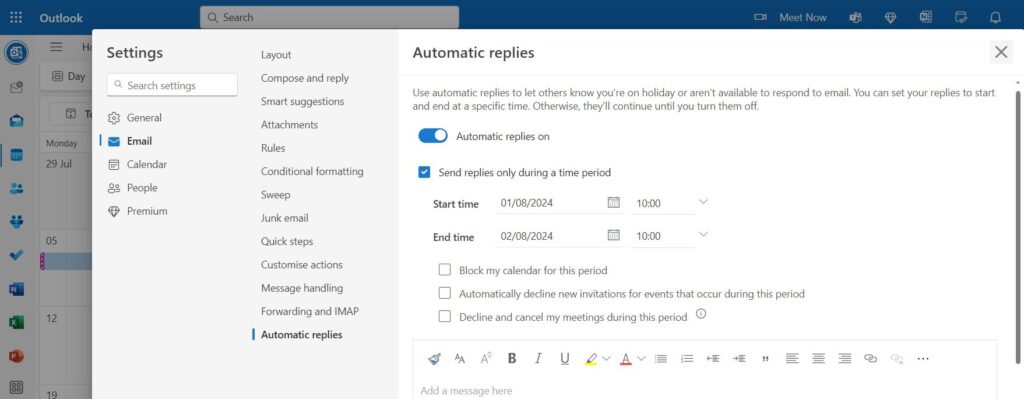
- Access Settings: To set up automatic replies, click on the Settings icon (gear) in the top-right corner of the Outlook Web interface.
- Open Mail Settings: From the settings menu, select View all Outlook settings at the bottom of the pane to access the full range of settings options.
- Enable Automatic Replies: Under the Mail category, select Automatic replies. Toggle the option to Send automatic replies and specify the duration of your absence.
- Compose Your Reply: Enter a message in the automatic reply box, detailing your absence dates, your return date, and alternative contact information. This message will be sent to anyone who emails you during your out-of-office period.

The Final Step: Save the Event
- Finalize and Save: After reviewing all the details, click Save & Close in the event window. This will finalize your out-of-office event and make it visible on your calendar.
- Double-Check: Take a moment to review your calendar to ensure the event appears correctly. It should be marked with the “Out of Office” status and the appropriate dates and times.
4. Advanced Tips for Managing Out of Office in Outlook
- Recurring Out of Office in Outlook Calendar Events: If you frequently need to take the same days off (such as for a weekly commitment or regular remote workday), Outlook allows you to set up recurring out-of-office events. When creating an event, select the Recurrence option and choose the frequency (daily, weekly, monthly, etc.) that fits your schedule.
- Shared Calendars and Permissions: If you work in a team environment or manage a shared calendar, it’s essential to set permissions appropriately so that your out-of-office status is visible to those who need to know. Ensure that your status is set to “Out of Office” and that your calendar permissions allow colleagues to view your availability.
- Sync with Mobile Devices: To ensure that your out-of-office settings are consistent across all devices, check that your Outlook app on your smartphone or tablet is synced with your desktop settings. This synchronization ensures that your calendar reflects your availability across all platforms, and you won’t miss setting an out-of-office event on any device.
Frequently Asked Questions (FAQ) about Setting Up Out of Office in Outlook
1. Can I customize my Out of Office message for different groups of people?
Yes, in Outlook, you can customize your Out of Office in Outlook Calendar message to send different replies to different groups. For example, you can set up one automatic reply for people within your organization and another for external contacts. This allows you to provide more detailed information to your colleagues while keeping it concise for external contacts. To do this, when setting up automatic replies, you’ll find separate boxes to customize your message for internal and external senders.
2. How do I cancel or modify an Out of Office event after it has been set up?
If you need to cancel or modify an Out of Office event, you can do so easily:
- Canceling an Event: Go to your Outlook Calendar, locate the Out of Office event you previously set up, and double-click to open it. You can then click Delete to remove the event entirely.
- Modifying an Event: To change the dates, times, or other details of the event, open it as described above, make the necessary changes, and then click Save & Close (in the desktop version) or Save (in Outlook on the web).
3. Will my Out of Office status block incoming meetings or appointments?
When you set your calendar status to “Out of Office,” it generally prevents others from scheduling meetings during that time. If someone tries to schedule a meeting with you, they’ll see that you’re unavailable during that period. However, this does not automatically block or decline meeting requests. If someone sends a meeting invite during your out-of-office period, it will still appear in your inbox, and you will need to manually decline it or let them know you’re unavailable.
4. Can I set up an Out of Office status on the Outlook mobile app?
Yes, you can set up an Out of Office status using the Outlook mobile app. The process is similar to the desktop version:
- Open the Outlook app and navigate to your calendar.
- Create a new event or open an existing one.
- Set the event as “Out of Office” by adjusting the availability status.
- You can also set up automatic replies directly within the mobile app by going to the settings and selecting “Automatic Replies.”
5. What happens if I forget to set my Out of Office status before leaving?
If you forget to set your Out of Office in Outlook Calendar status before leaving, your Outlook calendar will still function normally, but colleagues and contacts won’t know you’re unavailable unless you manually inform them. In this case, it’s best to set your Out of Office status as soon as you can, even if you’re already away. You can access Outlook remotely via the web or mobile app to make the necessary updates.
6. Can I include attachments in my automatic Out of Office replies?
Outlook does not allow attachments to be included in automatic Out of Office in Outlook Calendar replies for security reasons. However, you can include links to documents or shared drives where the necessary files are stored. This is particularly useful if your absence requires someone to access specific documents or resources in your absence.
7. How do I set up an Out of Office status for a shared mailbox?
To set up an Out of Office status for a shared mailbox, you must have appropriate permissions to manage the shared mailbox. If you do, you can follow these steps:
- Open Outlook and switch to the shared mailbox by selecting it from your account list.
- Follow the same steps as setting up an Out of Office status for a personal account, including creating a calendar event and setting up automatic replies.
- Make sure the status and replies are configured correctly to reflect that they apply to the shared mailbox and not your personal account.
8. Will my Out of Office reply send multiple times to the same person if they email me more than once?
By default, Outlook sends only one automatic Out of Office reply to each sender during your absence. This prevents the same person from receiving multiple identical responses if they send you several emails. The Out of Office reply to system resets after a certain period, usually when the automatic replies are turned off and then back on, or after a set number of days, depending on your organization’s settings.
9. Can I set an Out of Office status without sending automatic replies?
Yes, you can set an Out of Office in Outlook Calendar status on your calendar without enabling automatic email replies. Simply create the Out of Office event on your calendar and choose “Out of Office” as the status. This will block out your availability on your calendar, but your email will function normally without sending automatic responses.
10. How does time zone affect my Out of Office settings?
When setting up your Out of Office status, be mindful of time zones, especially if you’re traveling. Outlook allows you to set your start and end times according to different time zones. This ensures that your out of office message aligns correctly with your actual availability, preventing any confusion that might arise due to time zone differences. When creating the event, you can specify the time zone in the event details.
Conclusion
Setting up an Out of Office message in Outlook is a straightforward yet vital task that ensures effective communication and professional courtesy during your absence. Whether using the desktop version or Outlook on the web, following these comprehensive steps will ensure that your colleagues and contacts are well-informed of your availability. Customizing your message and setting up automatic replies further enhances communication, helping to avoid misunderstandings and ensuring that important tasks are handled in your absence.
