1.2.2.1. Leave Type Settings
How to Customize Leave Types in a Policy
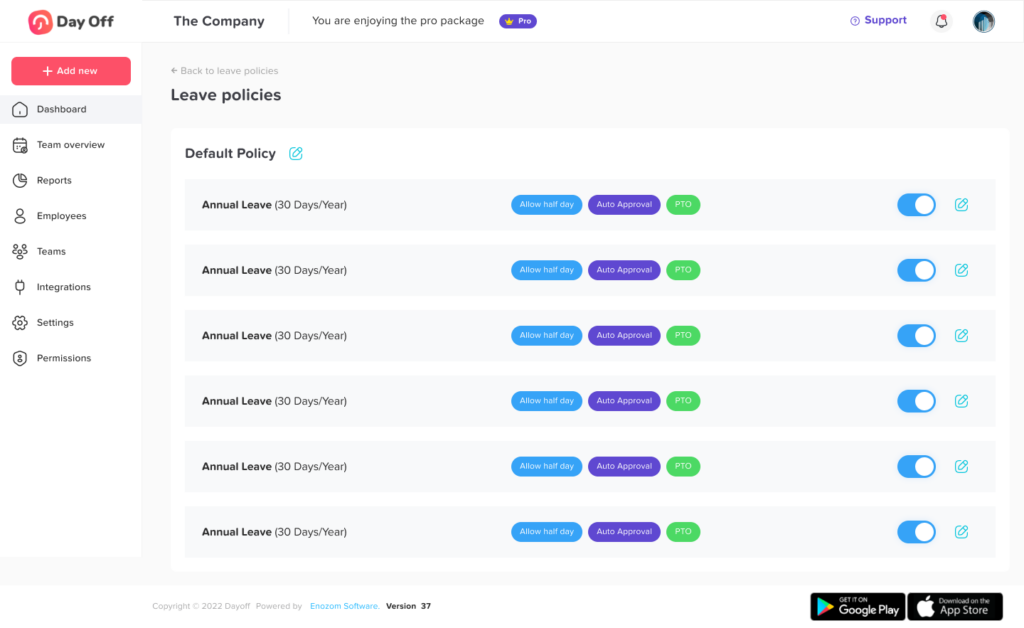
To adjust the leave types in any policy, follow these steps:
- Navigate to “Settings”, then select “Leave Policies”.
- Either edit an existing policy or create a new one from your list.
- In the policy settings, choose the relevant leave type to edit, and a popup will appear with its settings.
You’ll find several options for configuring the leave type:
Setting the Leave Balance
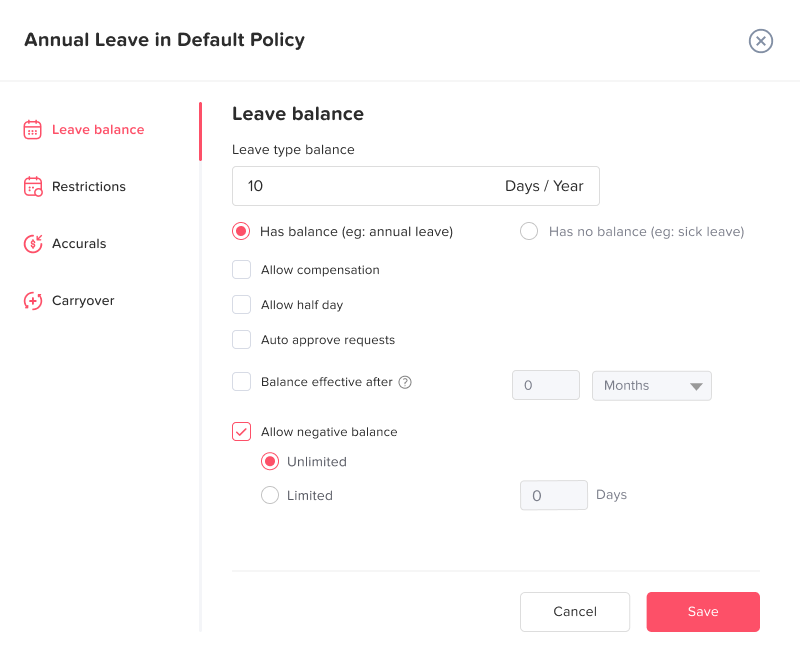
Setting the Leave Balance
The unit (e.g., days or hours) and cycle (e.g., annual, monthly) of the leave type are predefined when you first create it. You can then define whether the leave type has a specific balance or an unlimited one.
- Has balance: If selected, you can specify a fixed amount of leave (e.g., 10 days per year).
- Has no balance: This makes the leave balance unlimited, meaning employees can request as much time off as needed without any restriction on the amount.
Extra Options for Leave Types
These additional settings allow for more flexibility and control over how leave can be requested and used:
-
Allow half days: Employees can request leave in half-day increments instead of taking a full day off. This is useful for situations where only a part of the day is needed.
-
Allow compensation: This option lets employees earn additional leave as compensation for working overtime or during holidays. The extra time is added to their leave balance.
-
Auto-approve requests: When this is enabled, any requests for this leave type will be automatically approved, reducing administrative overhead. However, approvers and admins will still receive notifications and emails about the leave requests.
-
Balance effective after: Employees will be eligible to use this leave type after a specified period from their joining date.
-
Allow negative balance: This enables employees to take leave even if their balance is zero or negative, allowing flexibility in urgent situations, you can make it limited or set a limitation to the negative balance.
The Restrictions Section
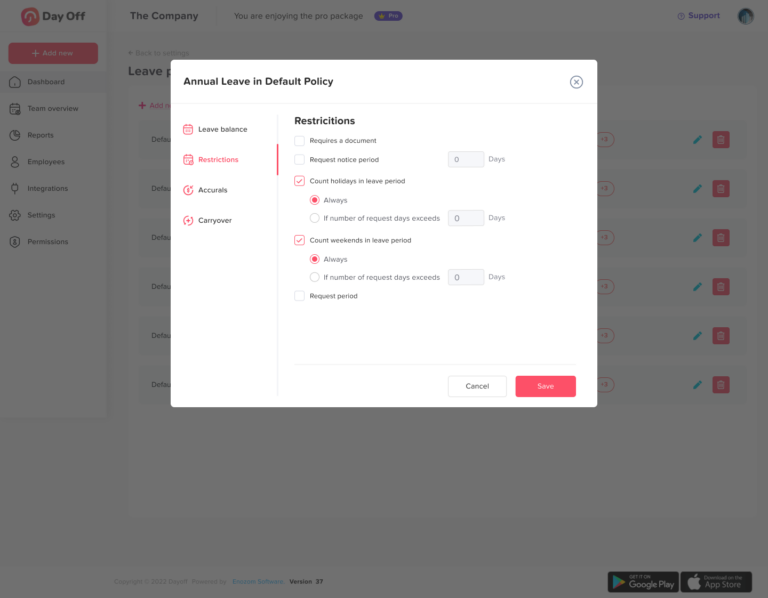
Requires document:
This mandates that employees attach supporting documents when requesting this type of leave. For example, a sick leave request would need to include a medical certificate.
Request notice period:
Setting the minimum notice period required for requesting vacation time, with an adjustable day or hour count.
Count holidays in leave type:
Option 1: Always Count Public Holidays: Public holidays that fall within the employee’s leave period will be counted as part of the total leave days deducted from their balance.
Option 2: Exclude Public Holidays Public holidays that fall within the leave period will not be counted as part of the leave days.
Option 3: You can configure a threshold for the number of leave days or hours an employee requests. Once this threshold is exceeded, public holidays within the leave period will start being deducted from the employee’s leave balance
Count weekends in leave type:
Option 1: Always Count Weekends: Weekends within the leave period are counted towards the total leave days, reducing the employee’s leave balance.
Option 2: Exclude Weekends: Weekends will not count as leave days. They will be excluded from the total leave period.
Option 3: You can configure a threshold for the number of leave days or hours an employee requests. Once this threshold is exceeded, weekends and/or public holidays within the leave period will start being deducted from the employee’s leave balance
Request period:
Defines the minimum and maximum duration for which leave can be requested
Accrual Settings
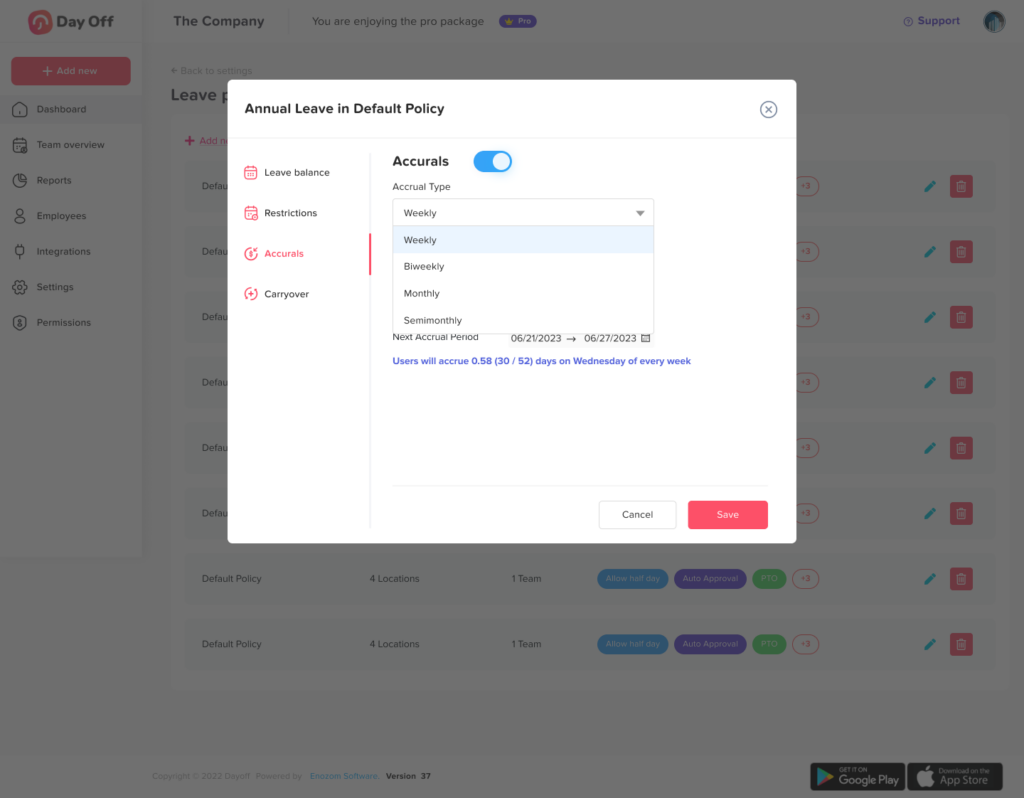
- Weekly accrual rate: When selecting the accrual type as Weekly, you can set on which day of the week you want the employees to get the balance, and the amount of balance added for the leave type will be divided by 52 weeks, accrued every week.
- Biweekly accrual rate: When selecting the accrual type as Biweekly, you can set on which day of the week you want the employees to get the balance, and the amount of balance added for the leave type will be divided by 26 weeks, accrued every two weeks.
- Monthly accrual rate: When selecting the accrual type as Monthly, you can set on which day of the month you want the employees to get the balance, and the amount of balance added for the leave type will be divided by 12 months, accrued every month on the selected date.
- Semimonthly: When selecting the accrual type as Semimonthly, the employee will accrue twice in the same month, he will get an accrual amount at the start of the month and another amount at the middle of the month.
Carryover Settings
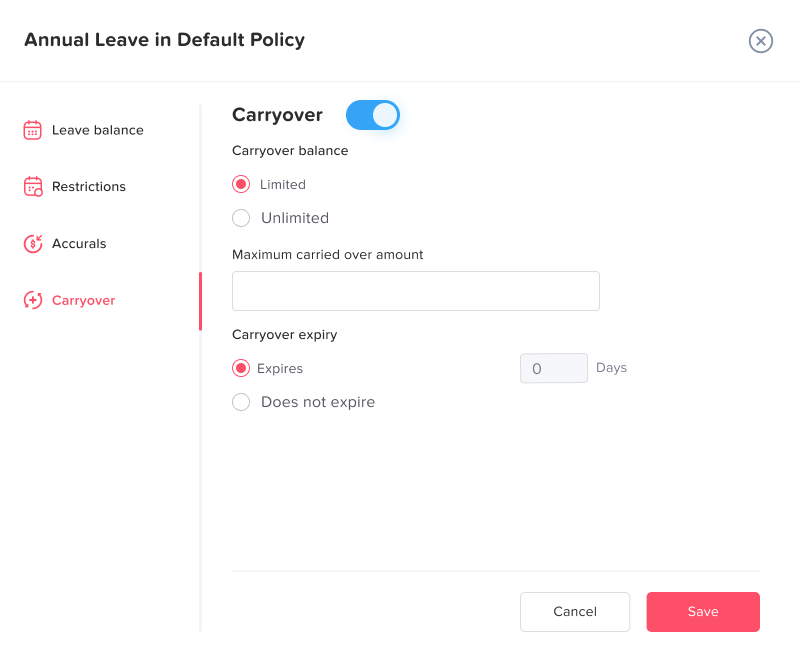
You can enable the carryover settings for the remaining balance from the previous year to be carried over to the following year
1. Amount
Unlimited: you can set the carried-over amount to be unlimited, so all the remaining balance will be carried over to the next year without any restrictions.
Limited: you can set a maximum amount to be carried over.
e.g.: set the maximum amount to 5 days, so if an employee has 10 days remaining, only 5 days will be carried over.
2. Expiry
Doesn’t expire: the carried-over balance can be used throughout the whole year; the employee can use the carried over amount at any time during the new working year.
Expires: you can set the carried-over balance to expire after a specified number of days starting from the balance reset date of each employee.
e.g.: The expiration date is after 50 days if those 50 days passed without the employee using his carried-over days/hours they will expire, and he will not be able to use them anymore.
After you finish setting up all of the leave types in the policy, click “Save” or “Update” to save the changes.