Archives: Knowledge Base

  • 1.2.4. Calendar Options

    From the “Calendar options” you can control what employees can view in their dashboard calendar on the web or mobile apps.

    The calendar shows the approved requests of employees as well as the official holidays. The options can be one of the following:

    All Company

    Everyone in the company will be able to view everyone’s’ accepted requests and know who is off on a specific date.

    Team members

    Employees in the same team will be able to view each other’s accepted requests.

    Locations

    Employees in the same location will be able to view each other’s accepted requests.

    Employee & subordinates

    Each employee will be able to view their own requests only, and if any of the employees is also an approver, they will be able to view their subordinates’ requests.

  • 1.2.3. Locations and Holidays

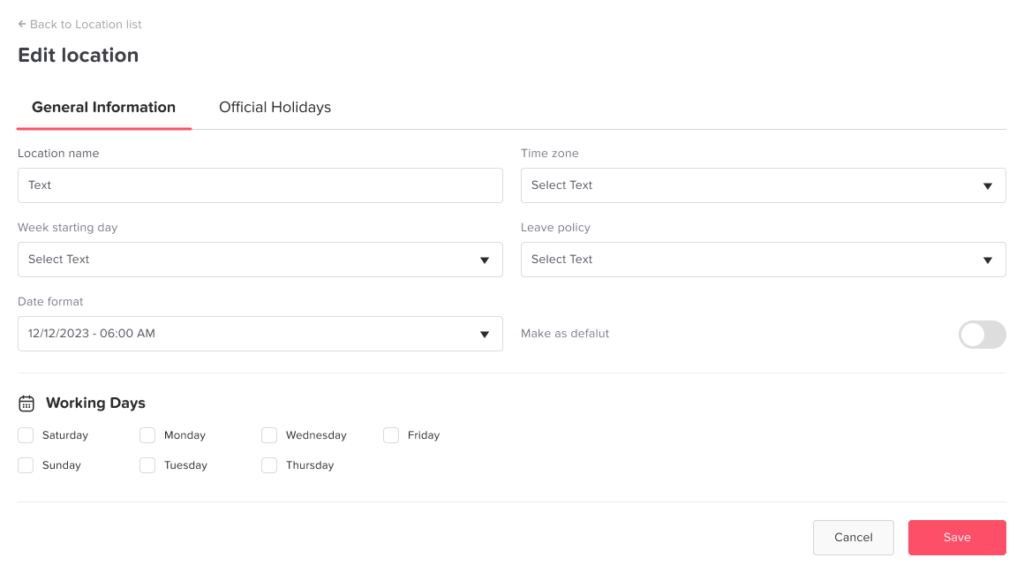
    If you have employees in different countries or locations, you can use the multi-locations feature to add locations and assign different leave policies to them

    Add Location

    1. Go to “Settings”, then “Location & holidays”
    2. Click “Add new location”
    3. Enter the following required location information
    (Location name, Time zone, Week starting day, Leave policy)
    4. Check the working days and uncheck the weekends of the location
    5. You can set this location as the default location
    6. Click “Save”

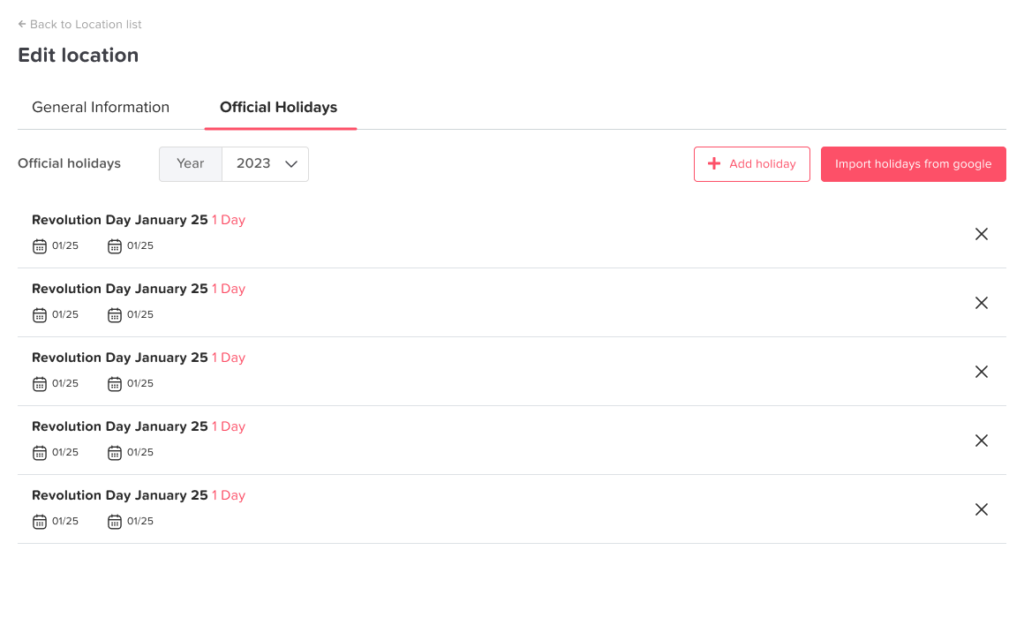
    Add the Location’s Official Holidays

    You can add the official holidays manually or by importing them from Google Calendar

    1. Add Holidays Manually

    1. Select the required year from the “Year” menu
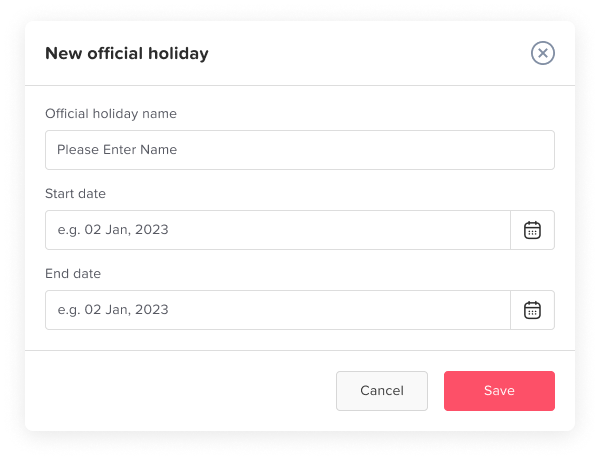
    2. Click “Add Holiday”
    3. Enter the holiday name, start and end dates
    4. Click “Save”

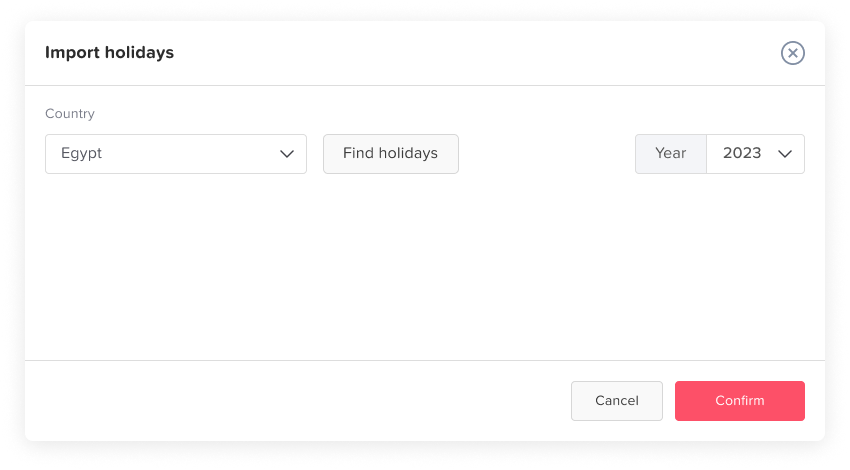
    2. Import from Google Calendar

    1. Click “Import holidays from Google”
    2. Select the required year from the “Year” menu
    3. From the “Country” menu select the required country
    4. Click “Find holidays”
    5. The list of official holidays from Google Calendar will show
    6. Select the required holidays to import
    7. Click “Confirm”

  • 1.2.2.1. Leave Type Settings

    How to Customize Leave Types in a Policy

    To adjust the leave types in any policy, follow these steps:

    • Navigate to “Settings”, then select “Leave Policies”.
    • Either edit an existing policy or create a new one from your list.
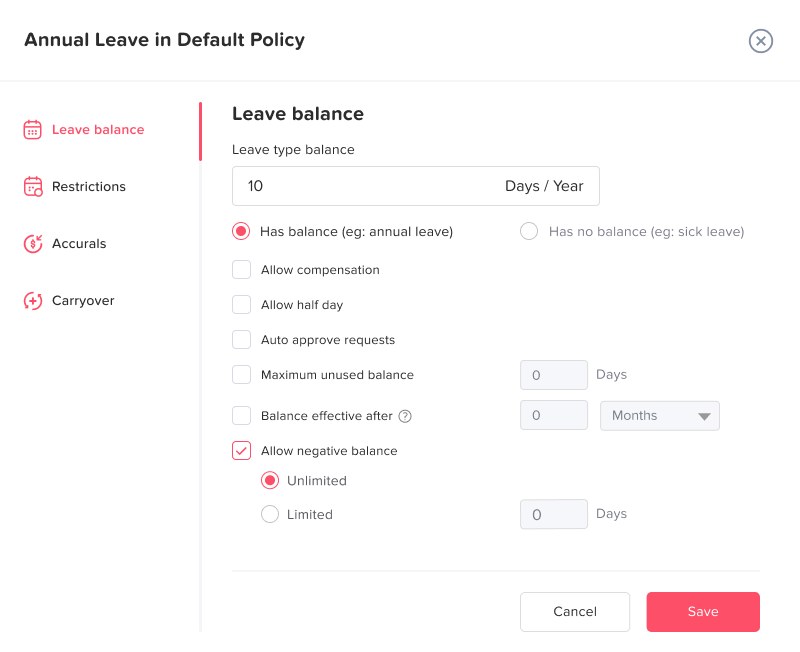
    • In the policy settings, choose the relevant leave type to edit, and a popup will appear with its settings.

    You’ll find several options for configuring the leave type:

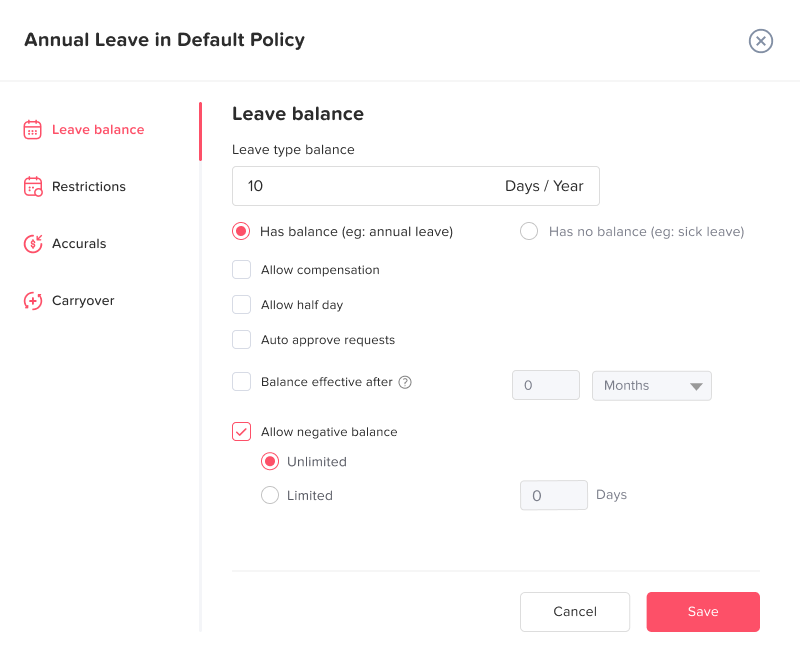
    Setting the Leave Balance

    Setting the Leave Balance

    The unit (e.g., days or hours) and cycle (e.g., annual, monthly) of the leave type are predefined when you first create it. You can then define whether the leave type has a specific balance or an unlimited one.

    • Has balance: If selected, you can specify a fixed amount of leave (e.g., 10 days per year).
    • Has no balance: This makes the leave balance unlimited, meaning employees can request as much time off as needed without any restriction on the amount.

    Extra Options for Leave Types

    These additional settings allow for more flexibility and control over how leave can be requested and used:

    • Allow half days: Employees can request leave in half-day increments instead of taking a full day off. This is useful for situations where only a part of the day is needed.

    • Allow compensation: This option lets employees earn additional leave as compensation for working overtime or during holidays. The extra time is added to their leave balance.

    • Auto-approve requests: When this is enabled, any requests for this leave type will be automatically approved, reducing administrative overhead. However, approvers and admins will still receive notifications and emails about the leave requests.

    • Balance effective after: Employees will be eligible to use this leave type after a specified period from their joining date.

    • Allow negative balance: This enables employees to take leave even if their balance is zero or negative, allowing flexibility in urgent situations, you can make it limited or set a limitation to the negative balance.

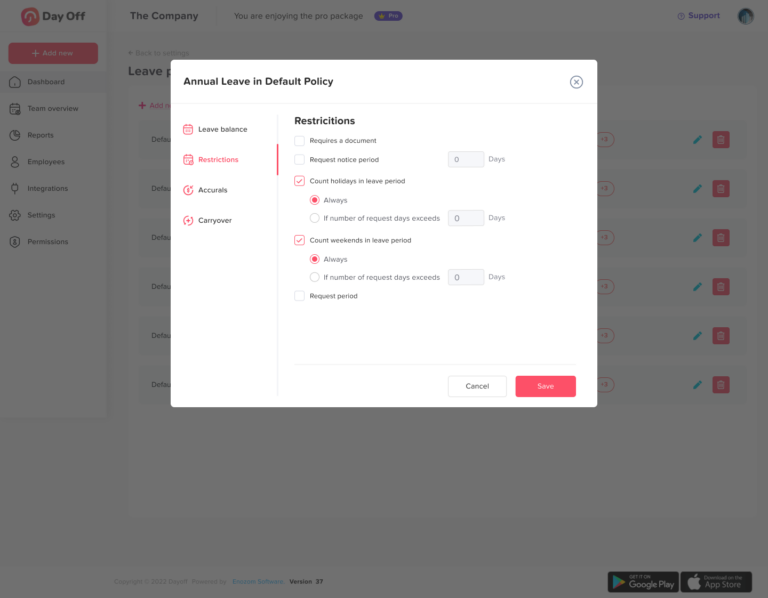
    The Restrictions Section

    Requires document:

    This mandates that employees attach supporting documents when requesting this type of leave. For example, a sick leave request would need to include a medical certificate.

    Request notice period:

    Setting the minimum notice period required for requesting vacation time, with an adjustable day or hour count.

    Count holidays in leave type:

    Option 1: Always Count Public Holidays: Public holidays that fall within the employee’s leave period will be counted as part of the total leave days deducted from their balance.

    Option 2: Exclude Public Holidays Public holidays that fall within the leave period will not be counted as part of the leave days.

    Option 3: You can configure a threshold for the number of leave days or hours an employee requests. Once this threshold is exceeded, public holidays within the leave period will start being deducted from the employee’s leave balance

    Count weekends in leave type:

    Option 1: Always Count Weekends: Weekends within the leave period are counted towards the total leave days, reducing the employee’s leave balance.

    Option 2: Exclude Weekends: Weekends will not count as leave days. They will be excluded from the total leave period.

    Option 3: You can configure a threshold for the number of leave days or hours an employee requests. Once this threshold is exceeded, weekends and/or public holidays within the leave period will start being deducted from the employee’s leave balance

    Request period:

    Defines the minimum and maximum duration for which leave can be requested

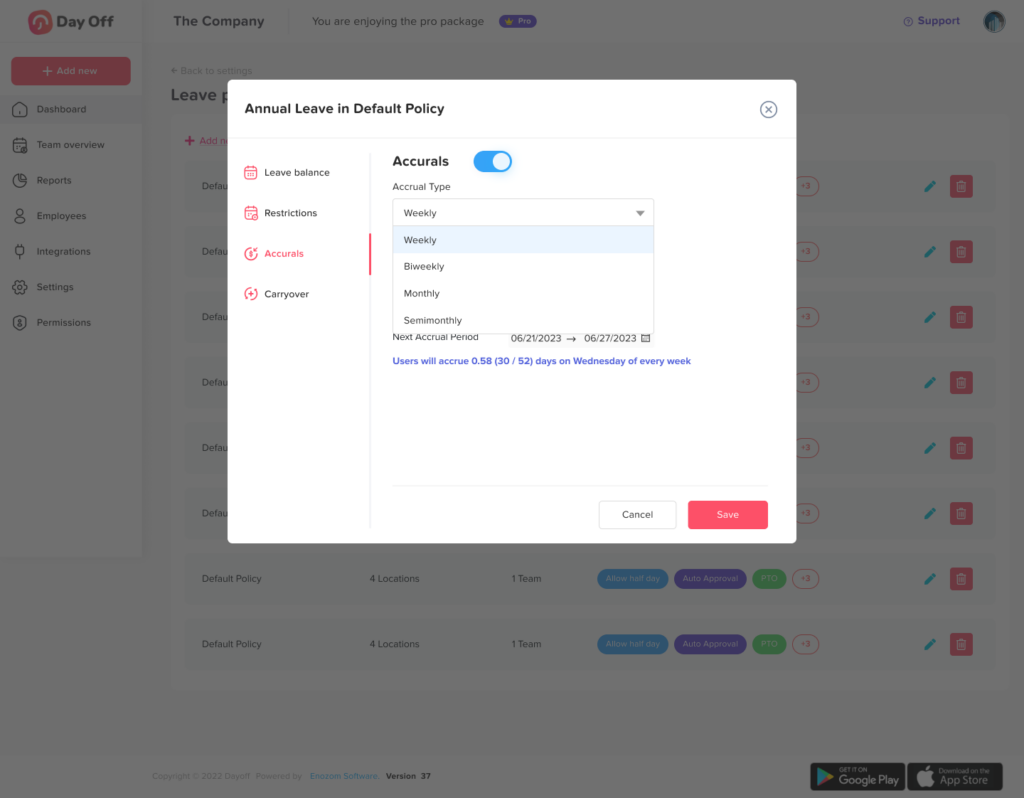
    Accrual Settings

    • Weekly accrual rate: When selecting the accrual type as Weekly, you can set on which day of the week you want the employees to get the balance, and the amount of balance added for the leave type will be divided by 52 weeks, accrued every week.
    • Biweekly accrual rate: When selecting the accrual type as Biweekly, you can set on which day of the week you want the employees to get the balance, and the amount of balance added for the leave type will be divided by 26 weeks, accrued every two weeks.
    • Monthly accrual rate: When selecting the accrual type as Monthly, you can set on which day of the month you want the employees to get the balance, and the amount of balance added for the leave type will be divided by 12 months, accrued every month on the selected date.
    • Semimonthly: When selecting the accrual type as Semimonthly, the employee will accrue twice in the same month, he will get an accrual amount at the start of the month and another amount at the middle of the month.

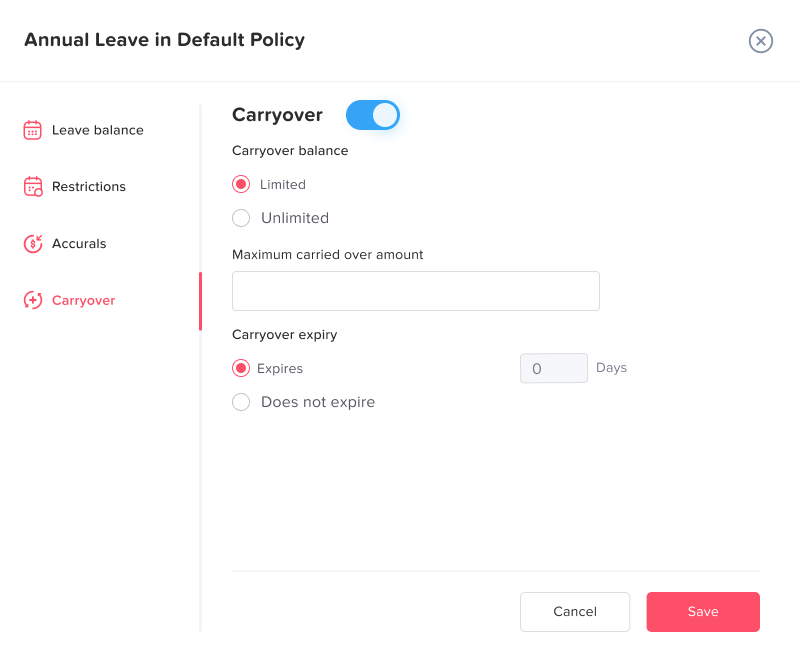
    Carryover Settings

    You can enable the carryover settings for the remaining balance from the previous year to be carried over to the following year

    1. Amount

    Unlimited: you can set the carried-over amount to be unlimited, so all the remaining balance will be carried over to the next year without any restrictions.

    Limited: you can set a maximum amount to be carried over.
    e.g.: set the maximum amount to 5 days, so if an employee has 10 days remaining, only 5 days will be carried over.

    2. Expiry

    Doesn’t expire: the carried-over balance can be used throughout the whole year; the employee can use the carried over amount at any time during the new working year.

    Expires: you can set the carried-over balance to expire after a specified number of days starting from the balance reset date of each employee.

    e.g.: The expiration date is after 50 days if those 50 days passed without the employee using his carried-over days/hours they will expire, and he will not be able to use them anymore.

    After you finish setting up all of the leave types in the policy, click “Save” or “Update” to save the changes.

  • 1.2.1. Leave Types

    Day Off leave types settings

    1. Create a New Leave Type

    As an administrator, you can customize the leave types for your company by following these detailed steps:

    • Navigate to Settings: Start by accessing the Settings menu in your dashboard.
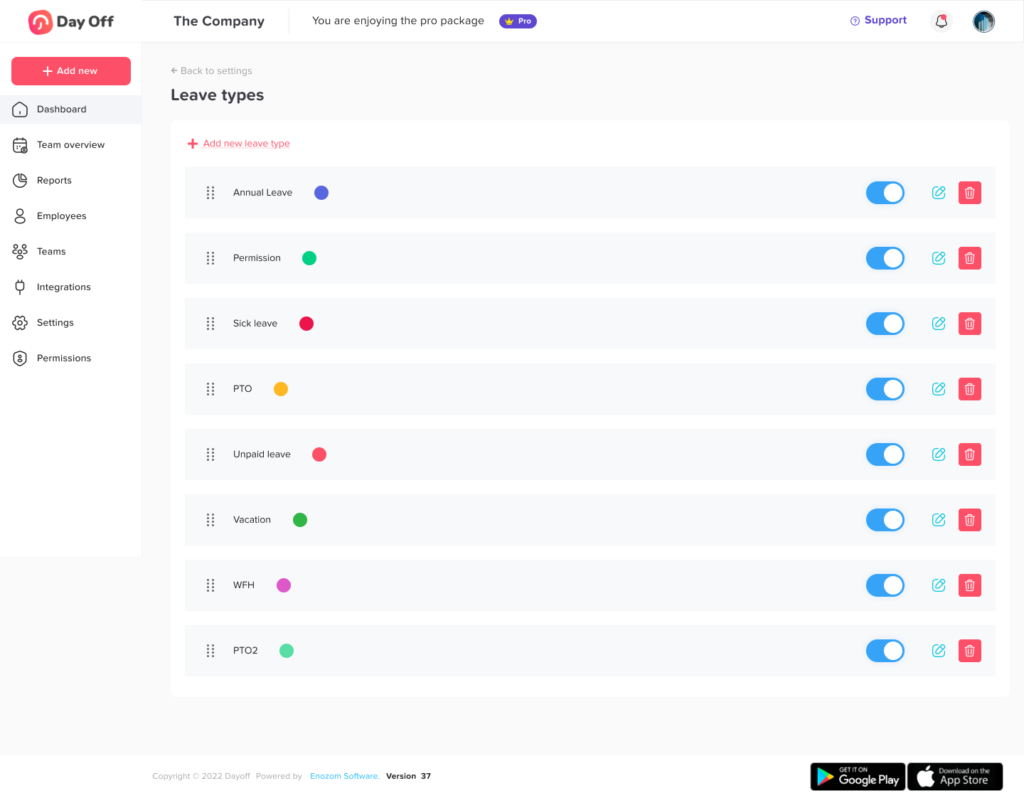
    • Modify Leave Types: Select the “Leave Types” section to view or modify existing categories.
    • Create New Leave Type: Click on “Add New Leave Type” to introduce a new category.
    • Enter Details: Provide essential information for the new leave type, such as the name of the leave, whether its balance unit is days or hours, and whether the cycle is on a yearly or monthly basis. Additionally, select a distinctive color for this leave type, which will be used to identify it in the dashboard calendar, requests, and reports.
    • Save: Confirm and save your settings. This new leave type will now be available for incorporation into your leave policies.

    2. Edit the Leave Type

    You have the flexibility to update the name and color of any leave type as needed to ensure your settings remain aligned with company Policies. Additionally, if a particular leave type has not yet been used meaning no requests have been submitted under that category, you can also modify its unit (days or hours) and cycle (yearly or monthly).

    3. Delete the Leave Type

    If a leave type has not yet been used meaning no leave requests have been submitted under that category, you have the option to delete it whenever necessary. To do this, simply click on the delete icon located next to each leave type.

    4. Disable the Leave Type

    If a leave type has already been used and has associated requests, you won’t be able to delete it to preserve historical data integrity. However, you can deactivate it to prevent any new requests. Simply turn off the activation toggler next to the leave type, and it will be disabled across all leave policies. This ensures that no new requests can be submitted for this category. If you decide to reactivate it later, you can easily turn the toggler back on

  • 1.2.2. Leave Policies

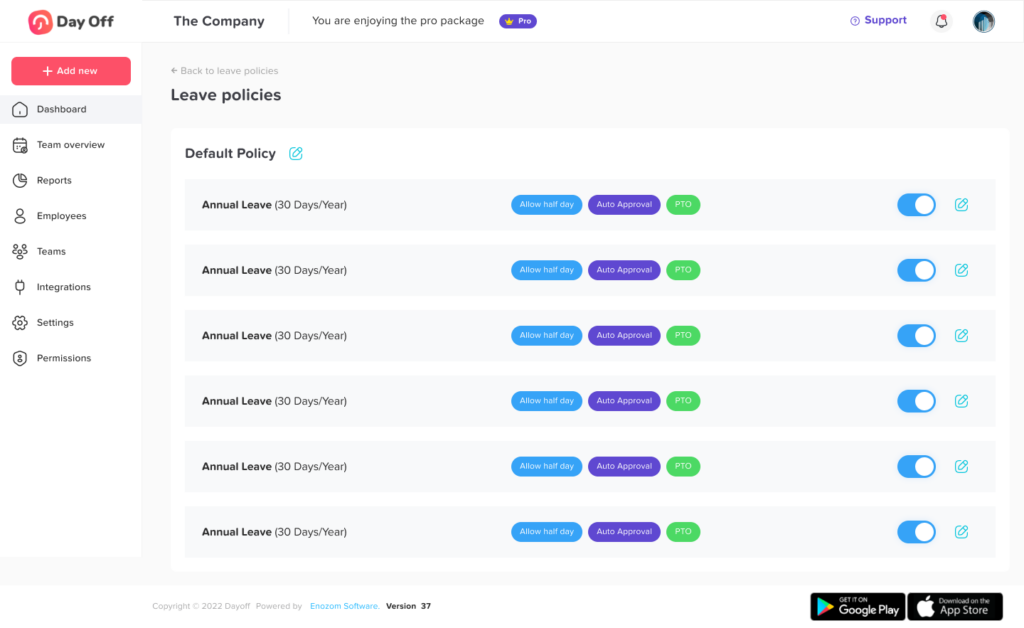
    For varying groups of employees with different leave policies, you can establish leave policies to be assigned to the employees as follows:

    1. Access “Settings,” then select “Leave policies.”

    To begin creating or editing leave policies, Locate the “Settings” section, which is often where various system configurations are managed. Under the “Settings” menu, find the option labeled “Leave policies.” This is where you can set up and manage leave policies that apply to different groups of employees.

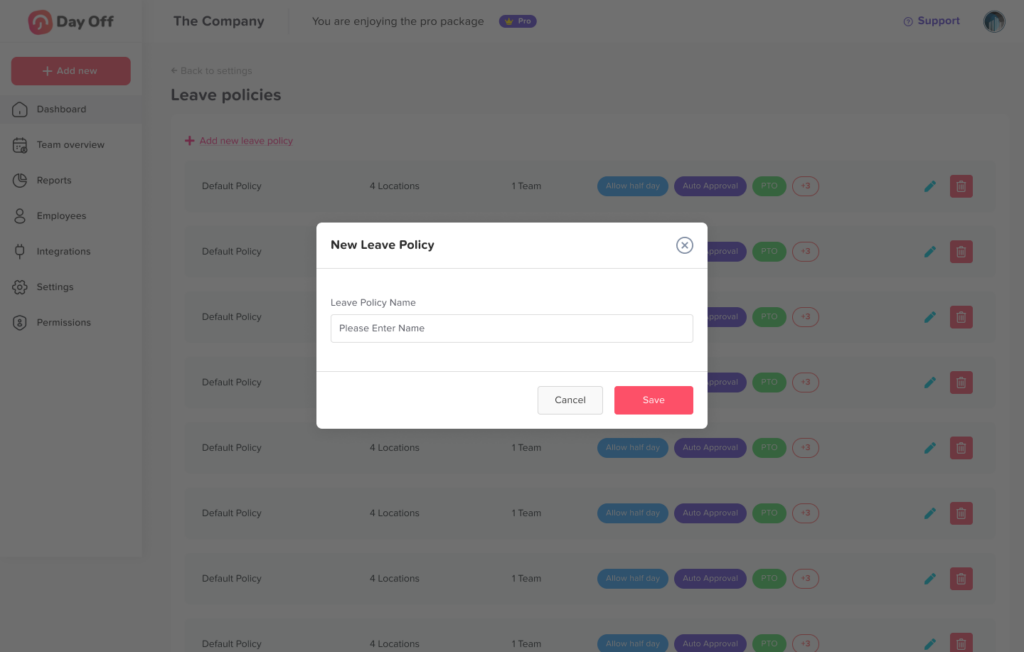
    2. Choose “Add new policy.”

    Once you’re in the “Leave policies” section, look for a button that allows you to create a new policy, typically labeled as “Add new policy.” Clicking this will open a new screen or form where you’ll begin the process of establishing a new leave policy for your organization. This step is crucial for ensuring that distinct policies can be applied to different employee groups.

    3. Name the policy and proceed by clicking “Next.

    At this stage, you need to give the leave policy a clear and descriptive name. The name should be representative of the group of employees or the type of leave the policy is intended for, such as “Full-time Employee Leave Policy” or “Contractor Leave Policy.” Once you’ve entered the name, click “Next” to move to the next step of the setup process. This helps keep your policies organized and easily identifiable.

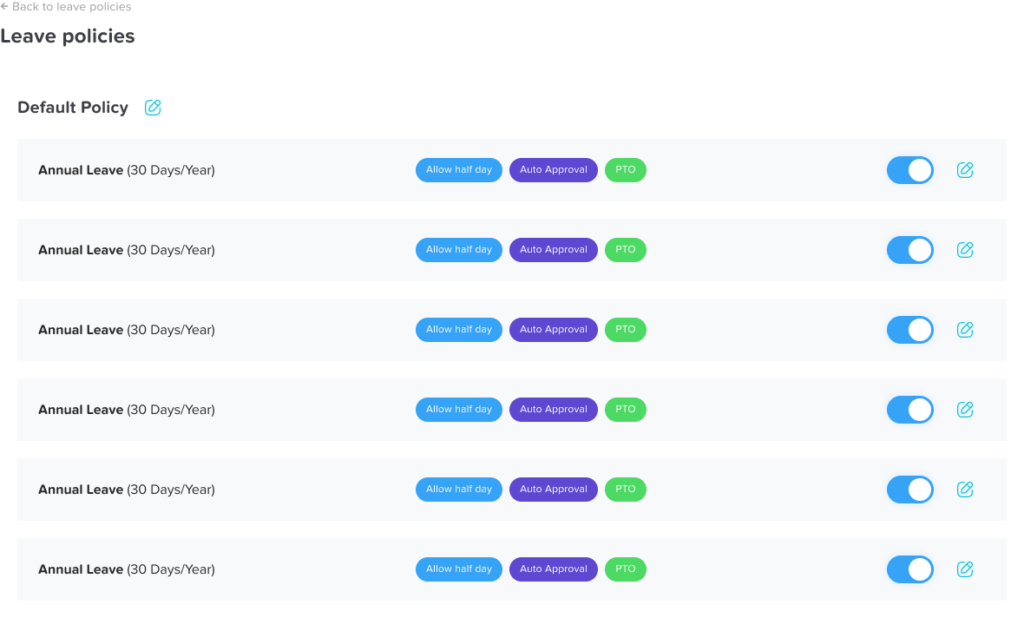
    4. You’ll see a list of leave types you previously created.

    The system will now display a list of all the leave types you’ve set up earlier, such as annual leave, sick leave, or maternity leave. These leave types are customizable and should reflect the different types of time off your organization offers. It’s important to review this list to ensure that the relevant leave types are available before proceeding to assign them to the policy.

    5. Activate the specific leave types you wish to include in the policy.

    From the list of leave types, turn the activation toggler on for the specific ones that will apply to this new policy. For example, for full-time employees, you might activate vacation leave, sick leave, and personal leave. By activating these leave types, you’re determining which kinds of leave employees under this policy can request or be granted.

    6. Choose the settings for each leave type within the policy and click “Save.”

    After selecting the leave types, you will need to configure the specific settings for each one. This may include defining accrual rates (how much leave an employee earns over time), the maximum amount of leave that can be carried over from year to year, and whether leave requests require manager approval. These settings should align with your company’s policies and the needs of the employee group this policy covers. Once all leave types are configured to your satisfaction, click “Save.”

    7. Once you’ve set up the necessary leave types within the policy, click “Update” to confirm your selections.

    After reviewing and setting up all the leave types and their configurations within the policy, perform a final check to ensure everything is accurate. Clicking “Update” at this point will lock in your selections, officially creating the leave policy. This policy will then be ready to assign to employees, ensuring they have access to the correct types of leave with the appropriate rules in place.

  • 9.. Pro Version Subscription & Billing

    Free trial

    You can get a One Month free trial for the pro version as follows:

    1. Login using the web app
    2. Click the free trial link at the top of the page
    3. Click the subscribe button
    4. Enter your card number and confirm
    5. You will be subscribed to the pro version for free for one month, and you can switch back to the free version anytime if you want to, and nothing will be deducted from your credit card.
    6. If you kept using the pro version, you will be charged at the end of the second month of your subscription.

    You can subscribe to the Pro Version of Day Off as follows:

    1. Click the “Upgrade Now” button on the upper left side of the page.
    2. You will be directed to the subscription page where you can find the subscription details.
    3. Click “Subscribe Now” on the right-hand side of the page.
    4. By the end of the month, you will be charged 1 $ per Active Employee.

    Billing

    At the end of each month, you will need to pay 1 $ per Employee to keep enjoying the pro features. You can pay the invoices as follows:

    1. In the web version, click on the company profile picture on the upper right-hand side of the page to open the menu.
    2. From the menu click “Billing” to go to the billing page.
    3. You can manage your credit cards and invoices.
    4. You will find your billing history with the following details:
    a) Billing period, which is the start and end dates of each month of using the pro version
    b) Description
    c) Amount
    5. You can pay the invoices by clicking ” Pay Now” in the “Actions” column.
    6. You can download paid invoices as PDF files by clicking the PDF icon in the “Actions” column.
  • 1.1. Create Company Account

    1. Start by downloading Day Off app on Android or iOS or use the Web version.
    2. Upon opening the app on your mobile device or browser, select “Create Company Account.”
    3. Provide necessary details such as Company Email, Name, HR name, Country, Time zone, and password.
    4. Click ‘Sign Up‘ to proceed.
    5. Follow the onboarding instructions to configure default working days, leave types, official holidays, and balance
      reset settings. These settings can be re-edited later.
    6. Your company account is now created successfully, allowing you to manage company settings and invite your employees.

    To begin using Day Off, whether you’re the company Admin or HR manager, follow these steps to create company account of your own:

    1. Start by downloading Day Off app on Android or iOS or use the Web version.
    2. Upon opening the app on your mobile device or browser, select “Create Company Account.”
    3. Provide necessary details such as Company Email, Name, HR name, Country, Time zone, and password.
    4. Click ‘Sign Up‘ to proceed.
    5. Follow the onboarding instructions to configure default working days, leave types, official holidays, and balance
      reset settings. These settings can be re-edited later.
    6. Your company account is now created successfully, allowing you to manage company settings and invite your employees.
  • 2. How to start using Day Off?

    To get started with Day Off, company administrators only need to create a company account. From there, they can customize company settings, define working days, specify types of leaves, and invite employees to use the platform. Detailed instructions on using Day Off’s features and functionalities can be found in the Company & Employees articles, providing in-depth explanations on how to make the most out of the application.

  • 2. Dashboard

    In the Dashboard you can find all about your leaves and balances as follows:

    Calendar

    1. In the calendar you can find your approved past and coming leaves.
    2. Based on the calendar settings made by the company admin, you can also find the leaves of your colleagues in the team or in the entire company so you can know who is on a leave in certain days.

    Used Balance

    You can find all your leave types, used and remaining balance for each type.

    Leave Requests

    1. You can find all your pending and past leave requests with their details and status.
    2. In case you changed your mind you can edit or even delete the pending leave request from the delete button next to it.

    Pending Requests

    1. If you are a First Approver/Direct Manager, then you will receive your employees leave requests first to get the first approval.
    2. In the Pending Requests section you can find your subordinate’s requests that needs your approval.

  • 3. Request Day Off

    You can request day of as follows: 

    1. Go to “Request Day Off”
    2. Choose leave type
    3. Choose leave start date or hour
    4. Choose leave end date or hour
    5. Check the “Half Day” checkbox in case of half day leave is required and if it’s allowed for the selected leave type
    6. Enter the leave reason
    7. Click “Submit Request” and wait for your manager’s approval, you will receive a notification once your request is accepted.

  • 4. Request Comp Off

    If Compensation days are allowed in your company, you can request Comp Off as follows:

    1. Go to “Request Compensation Off
    2. Choose leave type
    3. Choose leave start date or hour
    4. Choose leave end date or hour
    5. Check the “Half Day” checkbox in case of half day leave is required and if it’s allowed for the selected leave type
    6. Enter the leave reason
    7. Click “Submit Request” and wait for your manager’s approval
  • 1. Join Your Team

    To join your team you need to ask your company admin/ HR manager to add you to the team and send you an invitation with a “Temporary Password” that you will use to log in for the first time, once you receive the invitation you need to do the following:

    First Time Log In

    1. First you need to download Day Off for Android or iOS or you can use the web version of the app.
    2. Click “Log In
    3. Enter your email or phone number, whatever you were invited with.
    4. Enter the temporary password you received
    5. Click “Log In

    Set Password

    You will then be asked to set your password and confirm it to start using your account.