Archives: Knowledge Base

  • Can I track leave in hours?

    To allow employees to request and track time off in hours, you need to create a leave type with the balance unit set to hours. This configuration ensures that requests under this leave type are calculated hourly instead of in full or half days.

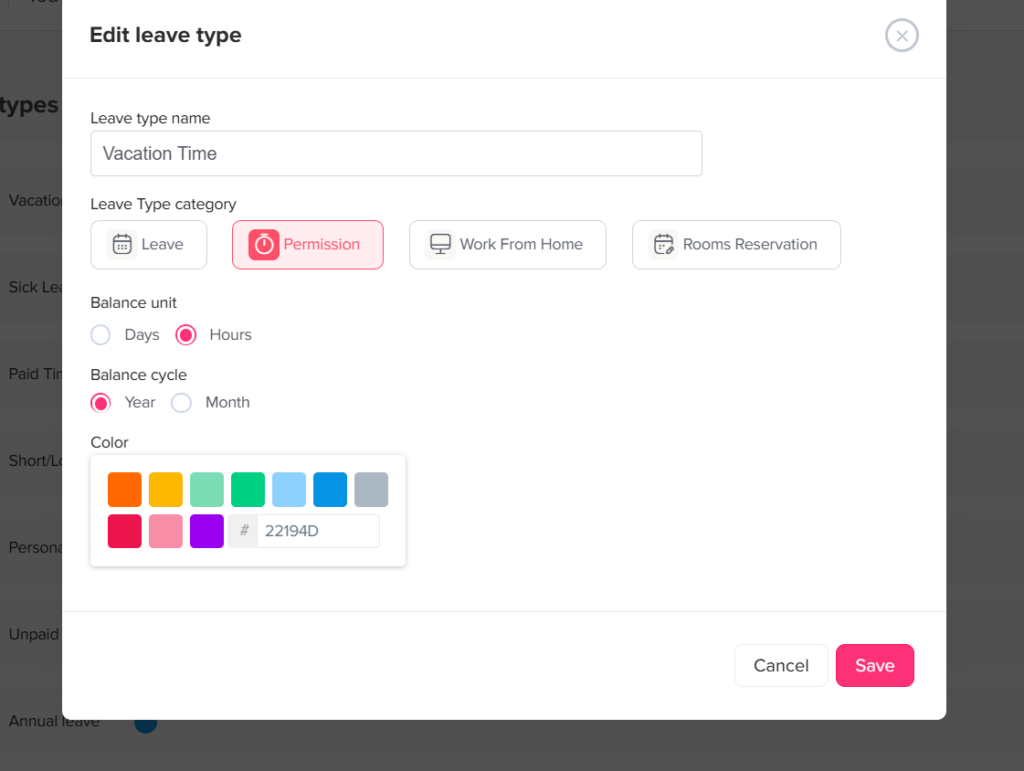
    Step 1: Create a Leave Type in Hours

    Day Off app feature showing employee leave tracking, PTO management and absence scheduling – Day OffDay Off
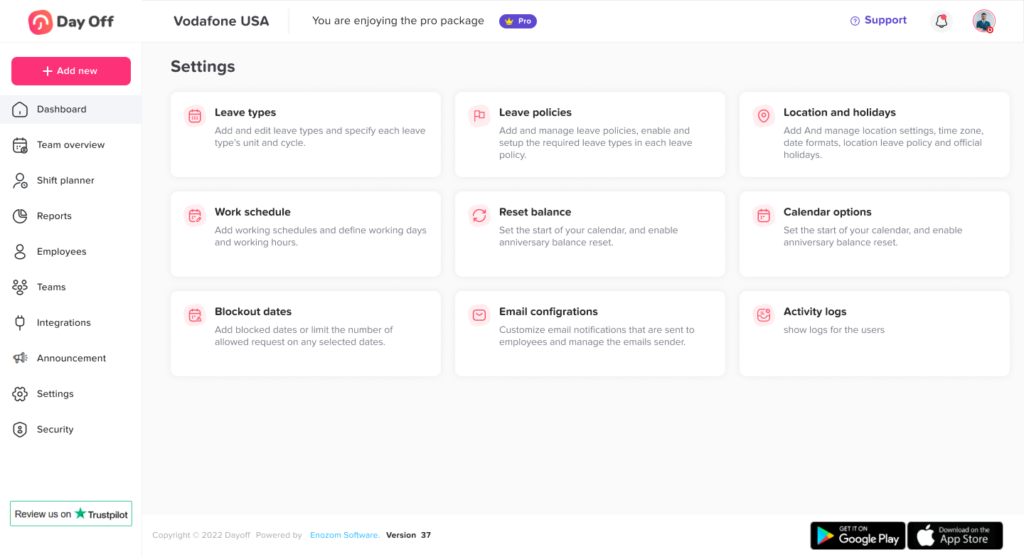
    • Go to Settings: From your dashboard, navigate to the Settings section where all system configurations are managed.

    • Open Leave Types: Within Settings, select Leave Types to view and manage all existing leave categories.

    • Click “Add a New Leave Type”: Click the option to create a new leave type. This will open a form for defining its details.

    • Enter a name: Provide a clear and descriptive name (e.g., “Paid Time Off” or “Short Leave”) so employees can easily identify it when submitting requests.

    • Select a category: Choose the appropriate category for the leave type, depending on how you want it to be classified and reported.

    • Set the balance unit to “Hours”: Change the balance unit from days to hours. This is the key step that enables hourly tracking and allows employees to request partial-day leave.

    • Choose a cycle: Define the leave cycle (e.g., monthly or yearly), which determines how balances are allocated and reset over time.

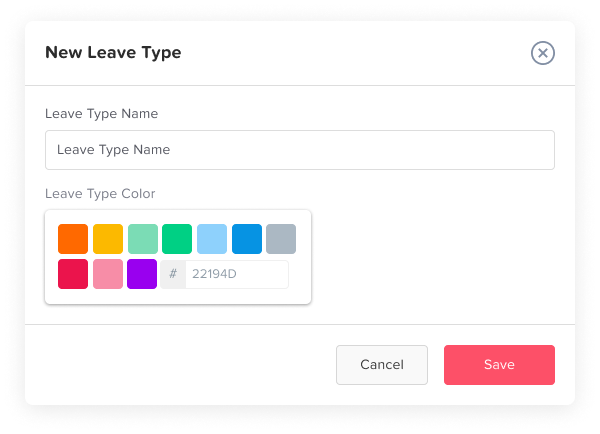
    • Select a color: Assign a color to the leave type to help visually distinguish it in calendars and reports.

    • Click Save: Save your changes to create the leave type. It will then be available for assignment and use.

    Step 2: Activate the leave type in a policy

    Day Off app feature showing employee leave tracking, PTO management and absence scheduling – Day OffDay Off
    • Go to Settings
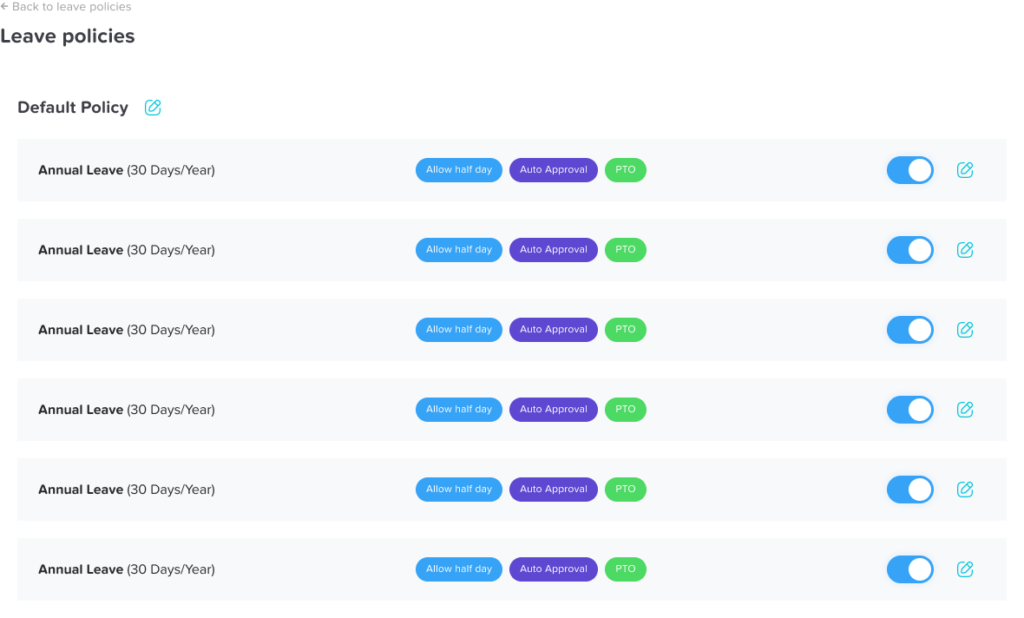
    • Open Leave Policies
    • Select an existing policy or click Create Policy
    • Navigate to the Leave Types section within the policy
    • Add or enable the newly created leave type
    • Configure the leave type rules (balances, accruals, limits, etc.)
    • Click Save

    Why this matters:
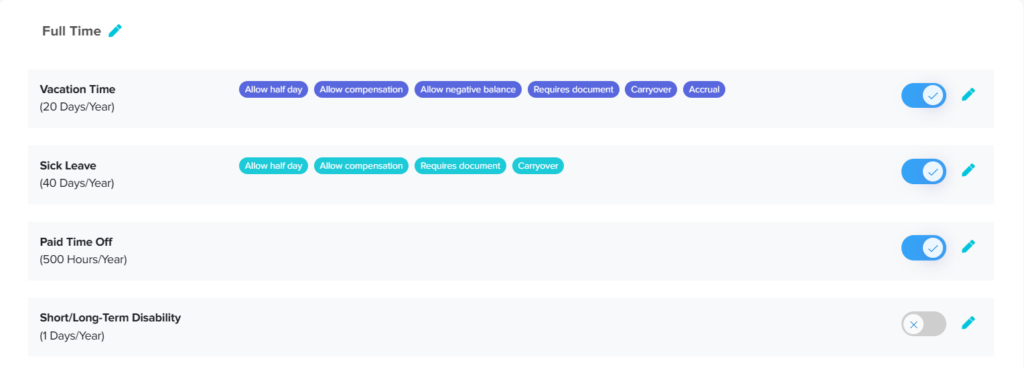
    A leave type will not be usable unless it is linked to a policy. Policies control who can request the leave and under what rules.

    Step 3: Add a work schedule in hours

    Day Off app feature showing employee leave tracking, PTO management and absence scheduling – Day OffDay Off

    To ensure accurate leave calculations when tracking in hours, you need to configure a work schedule that defines how many hours employees are expected to work.

    Steps to set up a work schedule (hours-based)

    • Go to Settings: Access the Settings section from your dashboard.

    • Open Work Schedule: Click on Work Schedule to manage existing schedules or create a new one.

    • Create or edit a schedule
      • Edit the default schedule, or
      • Click Add Work Schedule to create a new one

    • Select working days: Choose the days employees are expected to work (e.g., Monday to Friday). Weekends will be automatically excluded based on your selection.

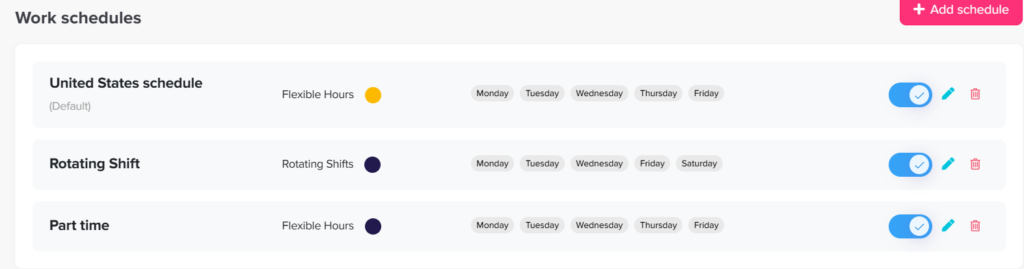
    • Choose a schedule type: You can select from three types of schedules:
      • Fixed Hours: Define a start and end time for each working day while allowing flexibility within that range.
      • Flexible Hours: Define the number of working hours per day without setting specific start and end times. This is the most suitable option for hourly leave tracking.
      • Rotating Shifts: Assign shifts based on a rotation pattern (e.g., morning or night shifts), typically used for shift-based teams.

    • Define working hours (for Fixed or Flexible schedules): Enter the number of hours employees are expected to work each day (e.g., 8 hours per day).

      This ensures leave is deducted accurately when requested in hours.
    • Save the work schedule: Click Save to apply the configuration.

    Summary

    To successfully track leave in hours, make sure you complete all three steps:

    • Create a leave type with the balance unit set to hours
    • Assign the leave type to a policy so employees can use it
    • Configure a work schedule in hours to ensure accurate calculations

    When all three are properly set, employees will be able to request leave in hours, and the system will deduct balances precisely based on their working schedule.

  • Can I use Day Off on mobile and web?

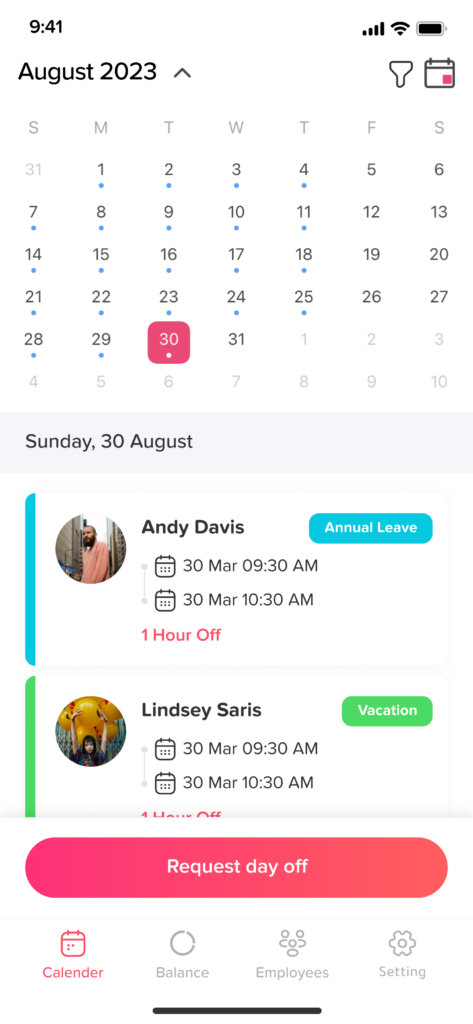
    Yes, Day Off is available on iOS, Android, and web, giving teams the flexibility to manage time off anytime, anywhere. While both versions are connected in real time and share the same core data, each platform focuses on a slightly different experience.

    Mobile App (iOS & Android)

    The mobile app is built for speed and convenience, making it perfect for employees and managers on the go.

    With the Day Off mobile app, you can:

    • Request time off in seconds
    • Approve or reject requests instantly
    • Get real time notifications
    • Check your leave balance anytime
    • View team calendars and upcoming absences

    The mobile experience is ideal for quick actions, keeping everyone connected without needing to open a laptop.

    Leave management screen in Day Off app showing employee time off requests, approvals and absence tracking – Day OffDay Off
    Leave balance overview in Day Off app showing remaining PTO days, sick leave and vacation entitlements – Day OffDay Off
    Leave request workflow in Day Off app showing how employees submit and managers approve time off – Day OffDay Off

    Web Version

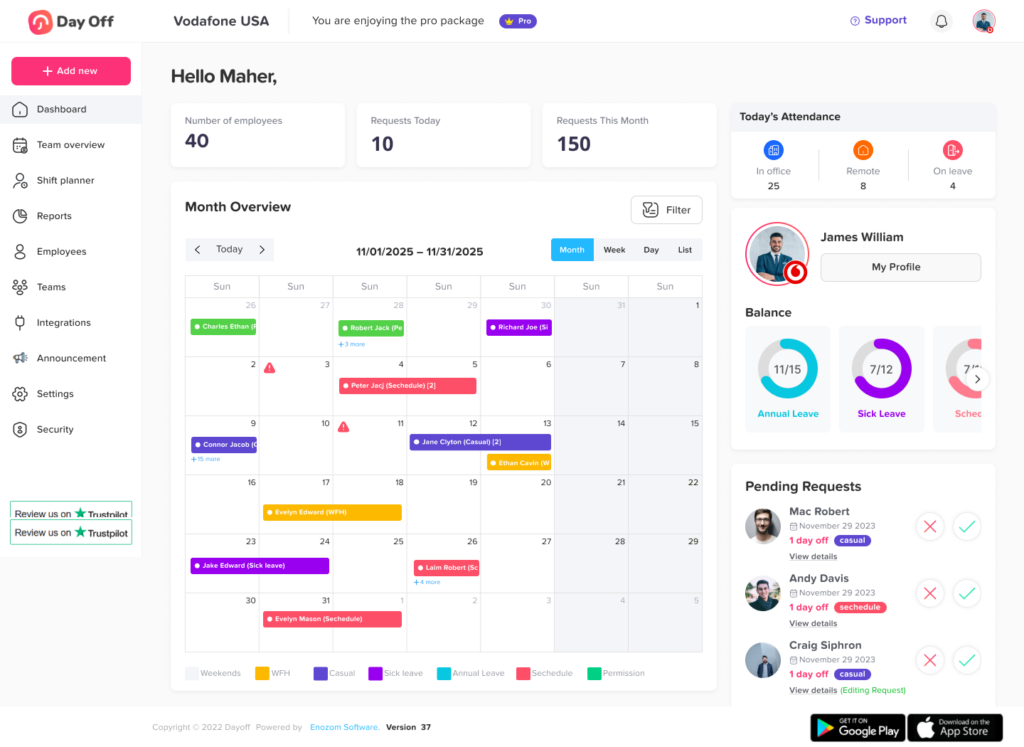
    The web version is designed for deeper control, making it especially useful for HR teams and administrators.

    With the Day Off web app, you can:

    • Set up and manage leave policies
    • Customize approval workflows
    • Manage teams, roles, and permissions
    • Access detailed reports and analytics
    • Configure company settings and integrations
    • Add Work schedules.
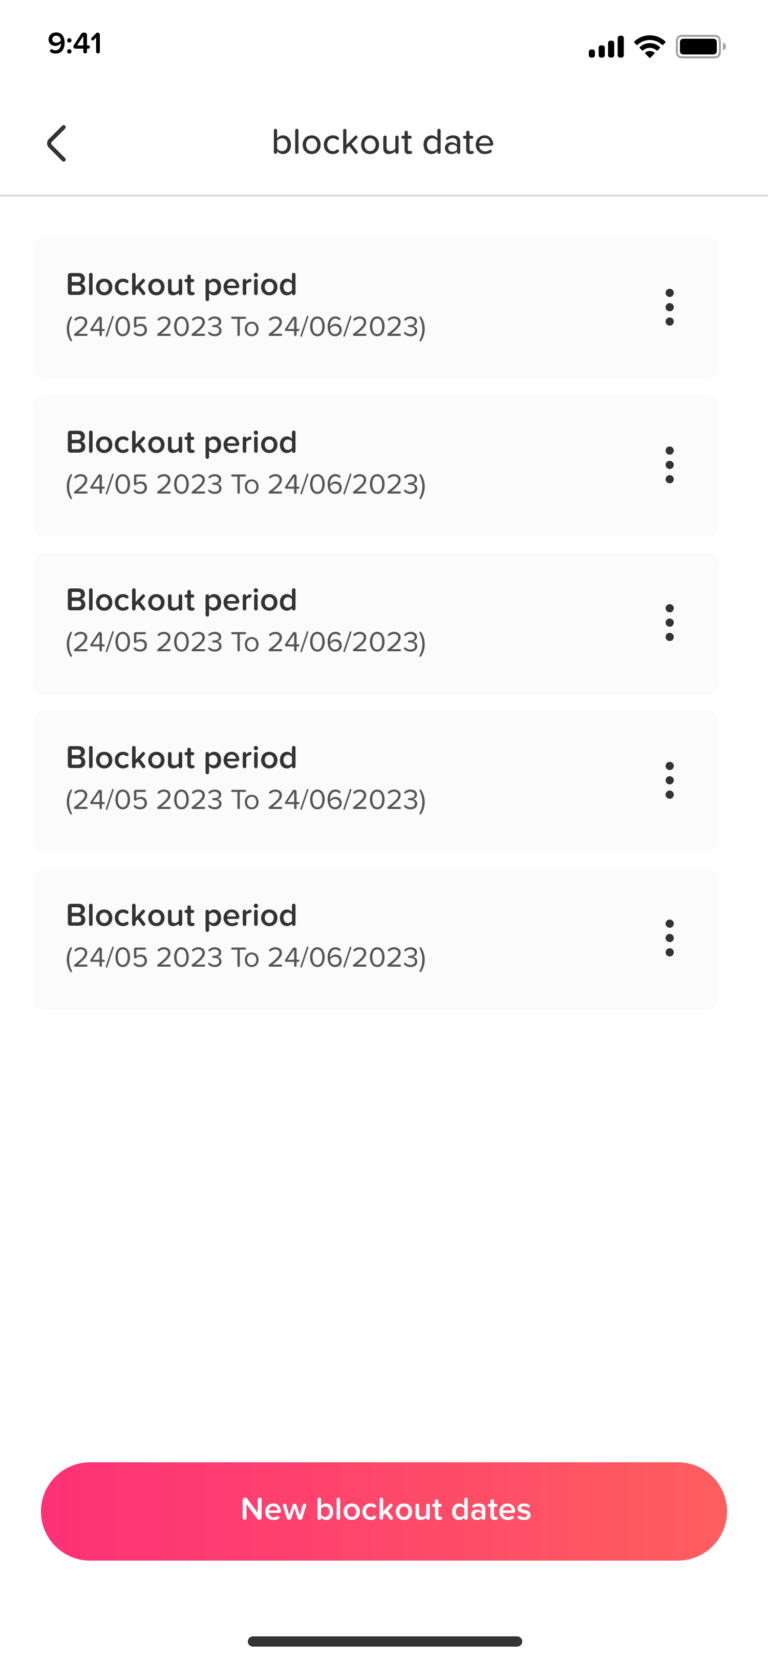
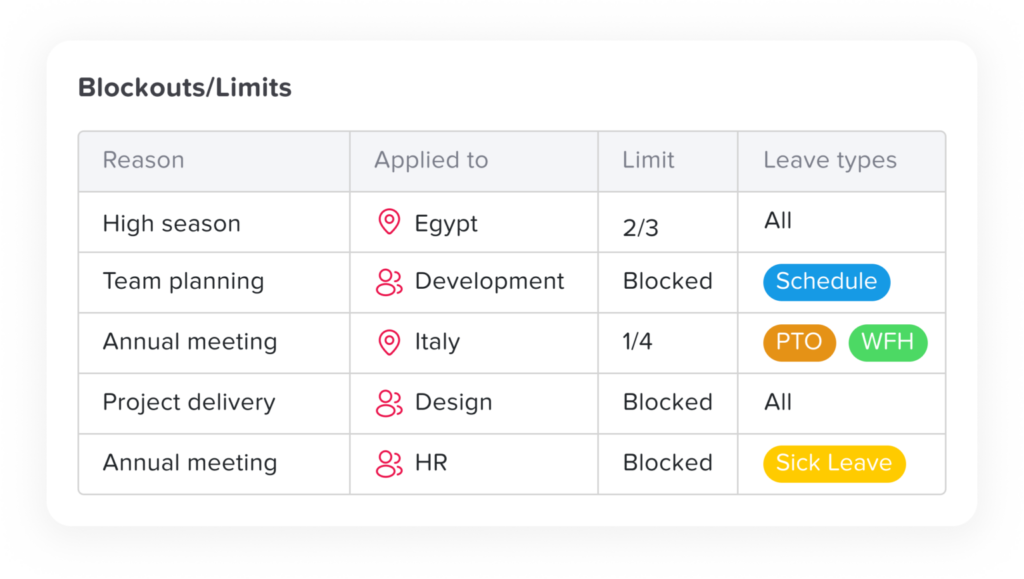
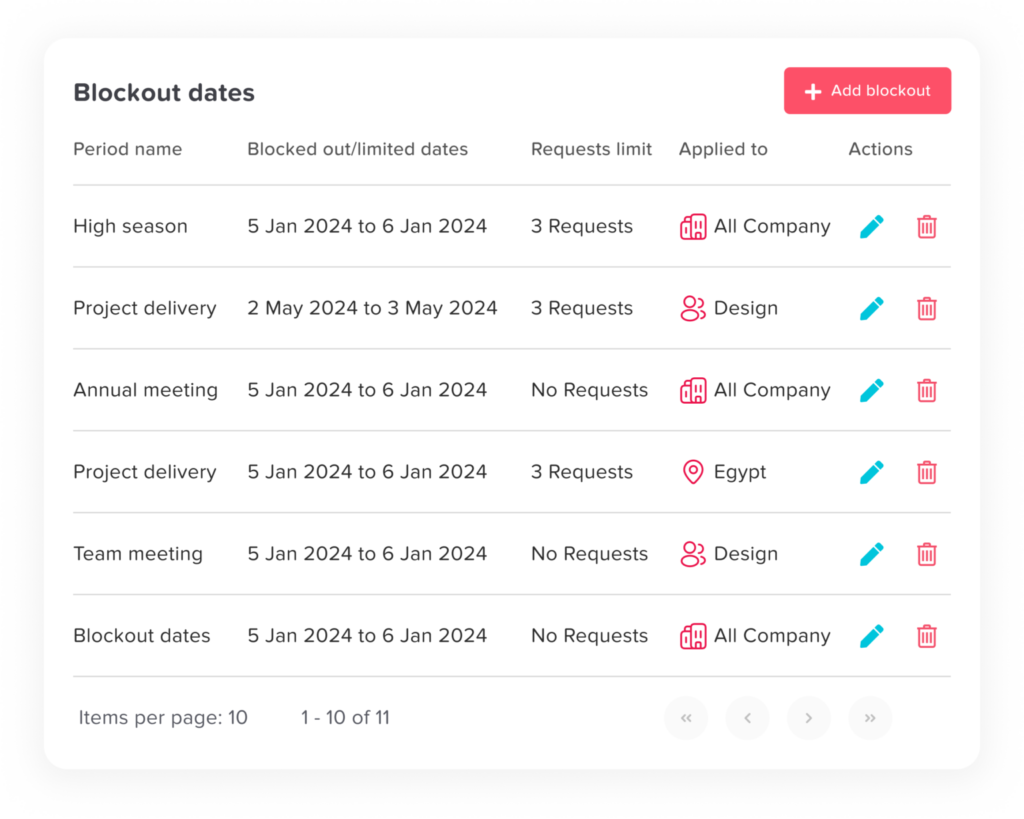
    • Add Blackouts 

    The web platform provides a more comprehensive dashboard for managing your organization’s leave system.

    Day Off dashboard displaying employee leave balances, upcoming absences and PTO overview for team managers – Day OffDay Off

    One System, Fully Synced

    No matter which platform you use, everything stays in sync. A request submitted on mobile appears instantly on the web dashboard, and approvals made on web are reflected on mobile in real time.

  • How to add a new leave type?

    Every company handles time off a little differently, and Day Off gives you the flexibility to reflect that. By adding a new leave type, you can align the system with your company’s policies and how your team actually takes time off.

    Creating a new leave type is simple, just follow the steps below:

    Steps to add a leave type

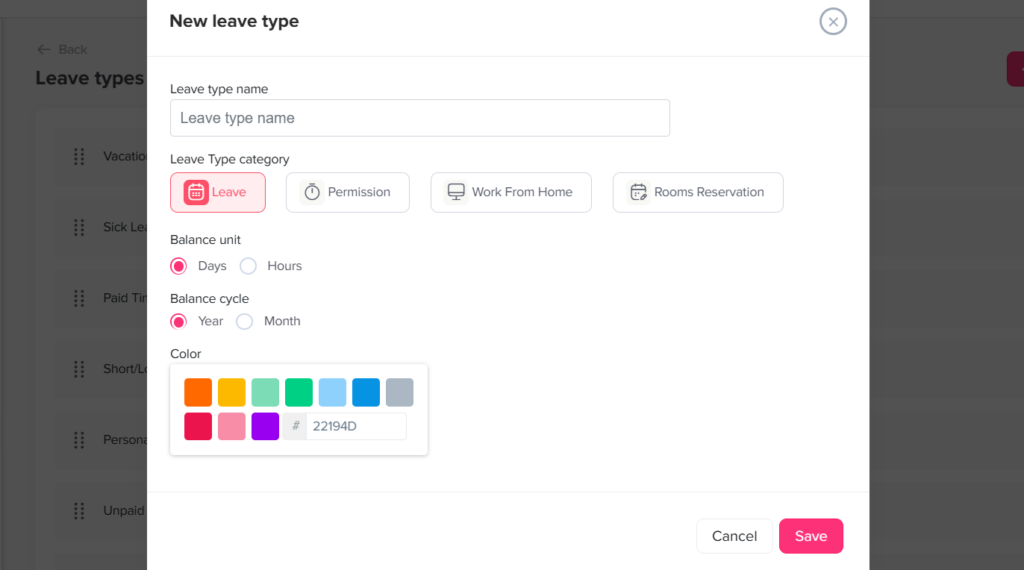
    From the left-side menu, go to Settings, then navigate to Leave Types. Click Add Leave Type to get started.

    Day Off app feature showing employee leave tracking, PTO management and absence scheduling – Day OffDay Off

    Enter the leave type name

    In the Leave type name field, enter a clear and descriptive name for the leave type (e.g., Annual Leave, Sick Leave).

    Select the leave type category

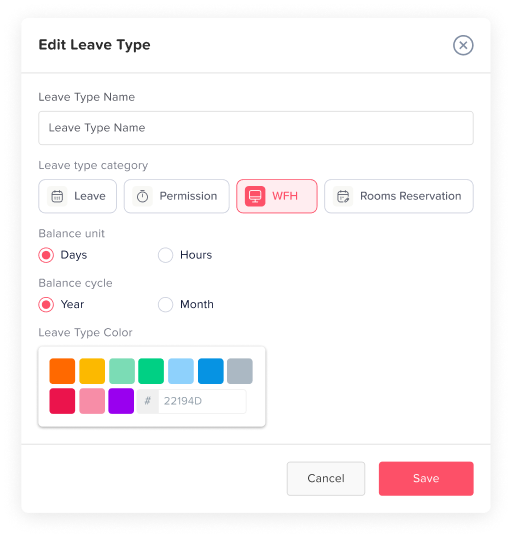
    Choose the leave type category based on how requests should behave:

    • Leave: Employees can submit only one request per day for this leave type.
      This is typically used for full-day absences like annual or sick leave.
    • Permission: Employees can submit multiple requests within the same day.
      This is ideal for short or partial-day requests, such as leaving for a few hours.
    • Work From Home: Used for remote work requests.
      This typically follows a daily request structure similar to leave.
    • Rooms Reservation: Used to book rooms or resources within the organization.

    Choose the balance unit

    Select how the leave will be measured and requested:

    • Days: Leave is requested in full days or multiple days.
      You can also allow half-day requests if this option is enabled in your leave policy.

    • Hours: Leave can be requested in hours or full/multiple days.
      Employees can select the start and end time of their leave, allowing for more precise, partial-day requests.

    Select a color

    Assign a color to the leave type. This color will appear in calendars, dashboards, and reports.

    Using distinct colors makes it easier to:

    • Quickly identify different types of leave
    • Spot patterns or overlaps
    • Improve overall visibility for managers and HR

    Save the leave type

    Once everything is set up, click Save to create the leave type.
    If you change your mind, click Cancel to discard your changes.

    Activate and configure the leave type in a policy

    Creating a leave type is just the first step. To make it available for employees, you need to add it to a leave policy.

    Go to your Leave Policy and include the new leave type in the policy assigned to your team or specific employees. Until this step is completed, the leave type will not appear in employee requests.

    Configure leave type settings

    Day Off app feature showing employee leave tracking, PTO management and absence scheduling – Day OffDay Off

    After adding the leave type to a policy, you can fully customize how it works. The settings are grouped below to help you configure everything more easily:

    Balance and accrual settings

    • Balance allocation
      Set a fixed number of days or hours, allow unlimited leave, or configure accrual over time.

    • Accrual rules
      Control how leave is earned (for example, monthly or yearly accrual).

    • Carryover rules
      Decide whether unused leave can roll over to the next period.

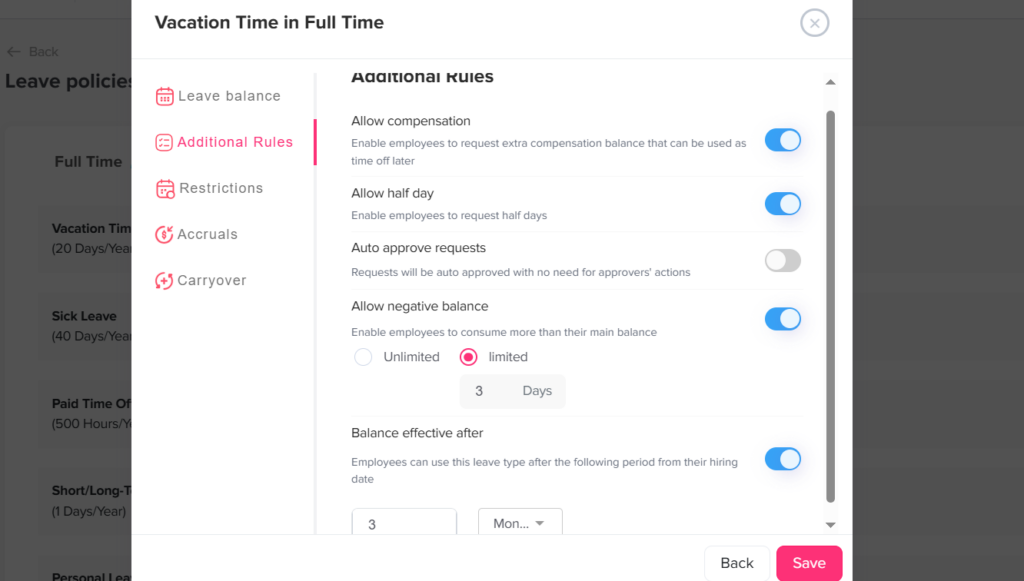
    • Negative balance
      Allow or prevent employees from requesting leave beyond their available balance.

    Request behavior and limits

    • Balance unit & partial requests
      Enable or restrict half-day and hourly requests based on your policy.

    • Request limits
      Set minimum or maximum request durations, or limit how far in advance leave can be requested.

    • Notice period
      Define how far in advance employees must submit their leave requests.

    • Late submission period
      Set a time limit for submitting leave requests after the leave date has passed.

    Approval and validation

    • Approval workflow
      Choose whether requests are automatically approved or require approval.
      If approval is required, you can define approvers and set up multiple approval levels for each employee individually.

    • Required document
      Require employees to upload supporting documents (such as a medical certificate) when submitting a request.

    Employee eligibility and rules

    • Probation period restrictions

      You can control whether employees on probation are allowed to request this leave type.

      You can also define when the leave balance becomes available, for example, making it accessible only after a specific period (such as 3 months from the employee’s joining date).

    Calendar and calculation settings

    Weekends

    Choose whether weekends are counted or excluded from the leave duration.

    • If included: weekends will be deducted from the employee’s leave balance
    • If excluded: weekends will be skipped and not counted as leave days

    Public holidays

    Choose whether official holidays are counted or excluded from the leave duration.

    • If included: public holidays will be deducted from the leave balance
    • If excluded: public holidays will not be counted as part of the leave

    Review and adjust when needed

    Leave policies may change over time. You can always return to the leave type settings to adjust balances, rules, or restrictions as your company’s needs evolve.

    Taking a few minutes to carefully configure each option ensures that leave requests are handled consistently and align with your organization’s policies.

  • How do I set up my company on Day Off?

    Once you’ve created your company account on Day Off, the next step is to properly configure your workspace so it reflects your company’s structure, policies, and approval process. This guide walks you through the essential setup steps to ensure everything runs smoothly from day one.

    1. Set Up Leave Types and Policies

    Leave types and policies work together to define how time off is structured and assigned across your company. It’s important to configure both correctly to ensure accurate leave tracking.

    Create Leave Types

    Day Off app feature showing employee leave tracking, PTO management and absence scheduling – Day OffDay Off

    Leave types represent the different kinds of time off employees can request (e.g., Annual Leave, Sick Leave).

    • Go to Settings.

    • Click on Leave Types.

    • Click Add New Leave Type.

    Fill in the Required Details

    • Name: Enter the leave type name (e.g., Annual Leave, Sick Leave).

    • Category: Select the appropriate category for the leave.

    • Balance Unit: Choose whether the leave is tracked in days or hours.

    • Cycle: Define how the leave resets (e.g., yearly).

    • Color: Assign a color to help visually distinguish this leave type in the calendar.

    • Click Save.

    Repeat: Repeat these steps to create all the leave types your company needs.

    Make sure to add all required leave types before moving to policies, as policies depend on them.

    Configure Leave Policies

    Leave policies define how leave types are assigned to employees and what rules apply to each one.

    • Go to Settings.

    • Click on Leave Policy.

    • Choose one of the following:

      • Edit an existing policy, or

      • Click Add Policy to create a new one.

    Day Off app feature showing employee leave tracking, PTO management and absence scheduling – Day OffDay Off

    Configure the Policy

    Inside the policy:

    • Enable Leave Types: Select the leave types you want to include in this policy.

    • Configure Each Leave Type:

      • Allowance: Set the number of days or hours allocated.

      • Additional Settings: Apply any limits or rules based on your setup.

    • Click Save.

    You can create multiple policies for different groups of employees (e.g., full-time vs part-time).

    2. Location Based Holidays Setup

    Day Off app feature showing employee leave tracking, PTO management and absence scheduling – Day OffDay Off

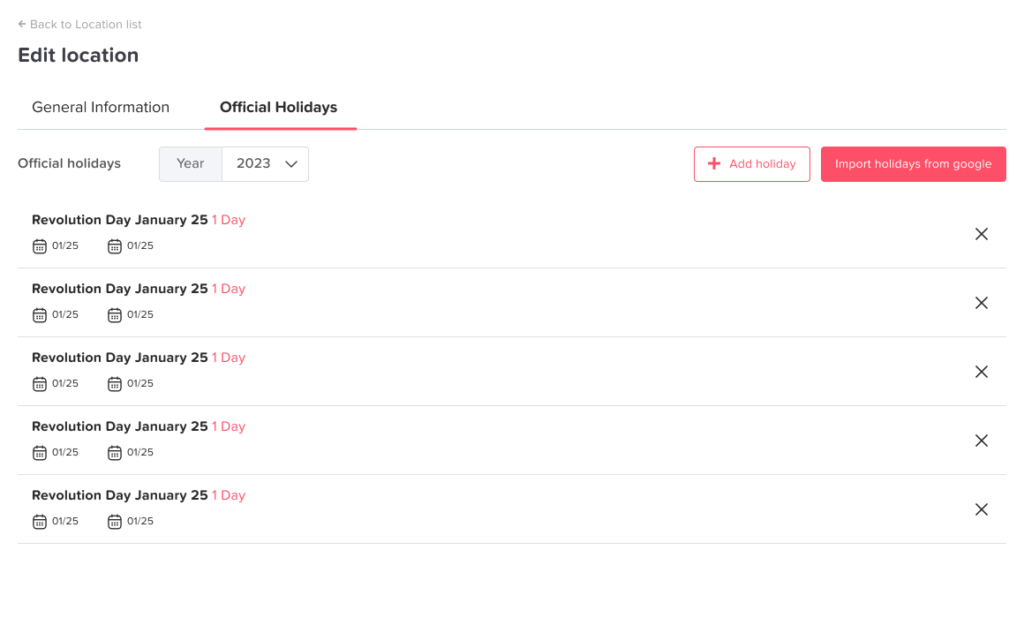
    Public holidays ensure employees are not charged leave on official days off.

    • Navigate to Settings → Locations and Holidays.
    • Add a new location or edit an existing one.
    • Go to the Holidays section within the selected location.

    Add Holidays

    Choose one of the following options:

    • Click Import Holidays and select your country and the year, or
    • Click Add Holiday to manually enter custom dates.

    Review and Customize

    After importing or adding holidays:

    • Remove Irrelevant Holidays
      Delete any holidays that do not apply to your organization.
    • Add Company-Specific Holidays
      Include internal days off (e.g., company holidays or special events).
    • Click Save to apply your changes.

    3. Add and Organize Employees

    Next, bring your team into the system and structure them properly.

    Steps:

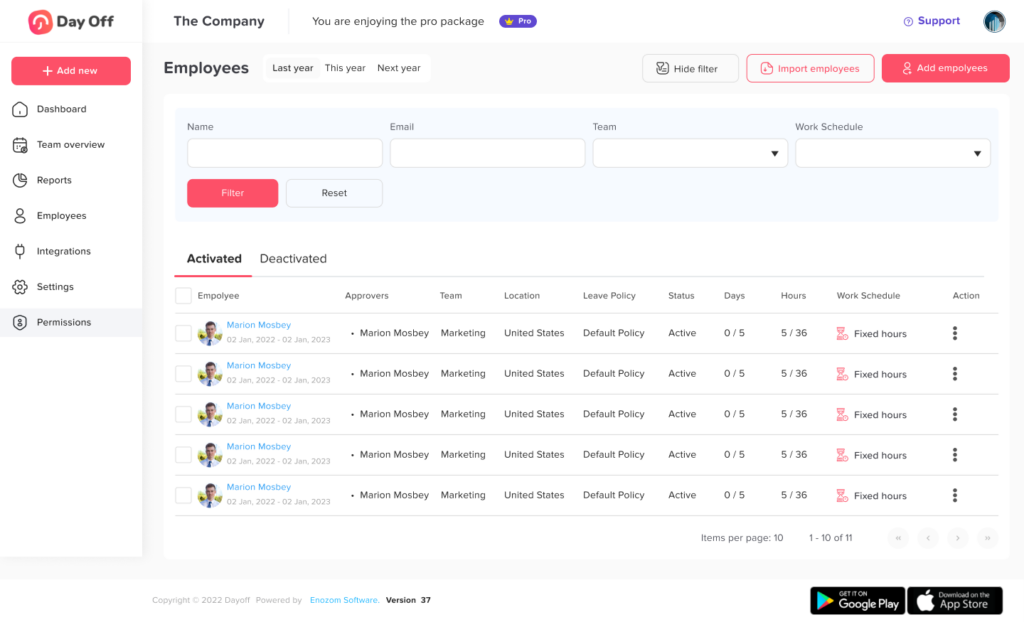
    • Go to Employees.
    • Click Add Employees or Import Employees.
    Day Off app feature showing employee leave tracking, PTO management and absence scheduling – Day OffDay Off

    Basic Information

    Choose how to invite the employee:

    • By email, or
    • By mobile

    Fill in the required details:

    • Email Address
    • Employee Name
    • Role

    Joining Details

    • Joining Date
      Select the employee’s start date.
    • Reset Balance Every Anniversary
      Enable this option if leave balances should reset on the employee’s work anniversary.

    Advanced Settings

    Configure additional employee details:

    • Location
      Assign the employee’s work location.
    • Work Schedule
      Select the appropriate schedule.
    • Team
      Assign the employee to a team or create a new one.
    • Leave Policy
      Choose the applicable leave policy.
    • Time Zone
      Set the employee’s working time zone.

    Approval Settings

    • Day / Comp Off Approval
      • Select 1-step approval, or
      • Select 2-step approval
    • First Approver(s)
      Assign the person(s) responsible for approving requests.
      You can select multiple approvers for each approval level.
    • Watchers
      Enable this option if additional stakeholders should be notified.

    Final Step

    Click Save to add the employee.

    4. Create Departments and Teams

    Organizing employees into departments improves visibility and simplifies approvals.

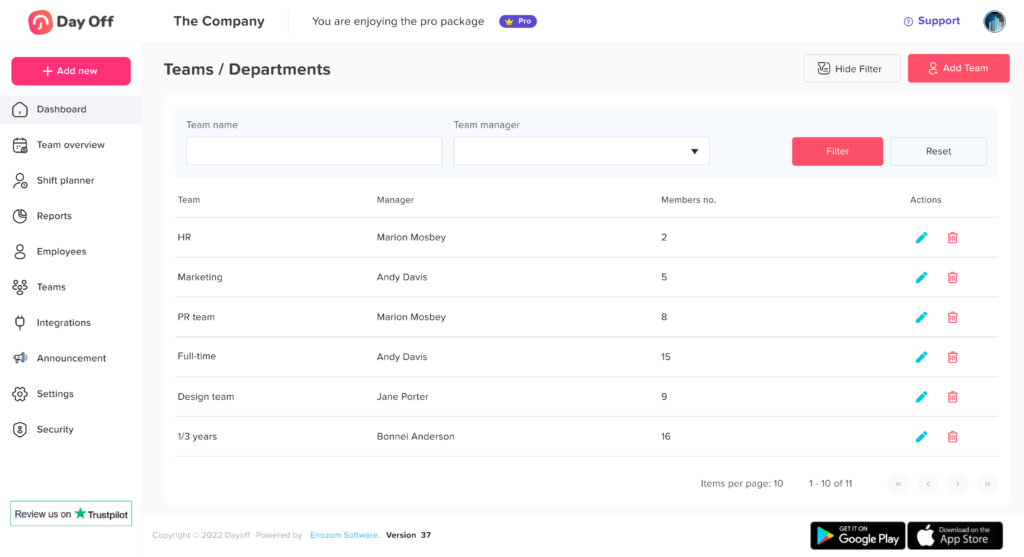
    • Go to Settings, then to Teams.
    • Click on Add Team.
    Team absence management view in Day Off showing all employees leave status and upcoming time off – Day OffDay Off

    Team Information

    Enter the Team Name.

    Approval Settings

    • Day / Comp Off Approval
      • Select 1-step approval, or
      • Select 2-step approval
    • First Approver(s)
      Assign the person(s) responsible for approving requests.
      You can select multiple approvers for each approval level.
    • Watchers
      Add stakeholders who should be notified of requests.

    Leave Policy

    • Override Location’s Policy
      Enable this option if you want this team to have a different leave policy than the default location policy.
    • Leave Policy
      Select the leave policy to apply to this team (e.g., Full Time).

    5. Set Up Work Schedule

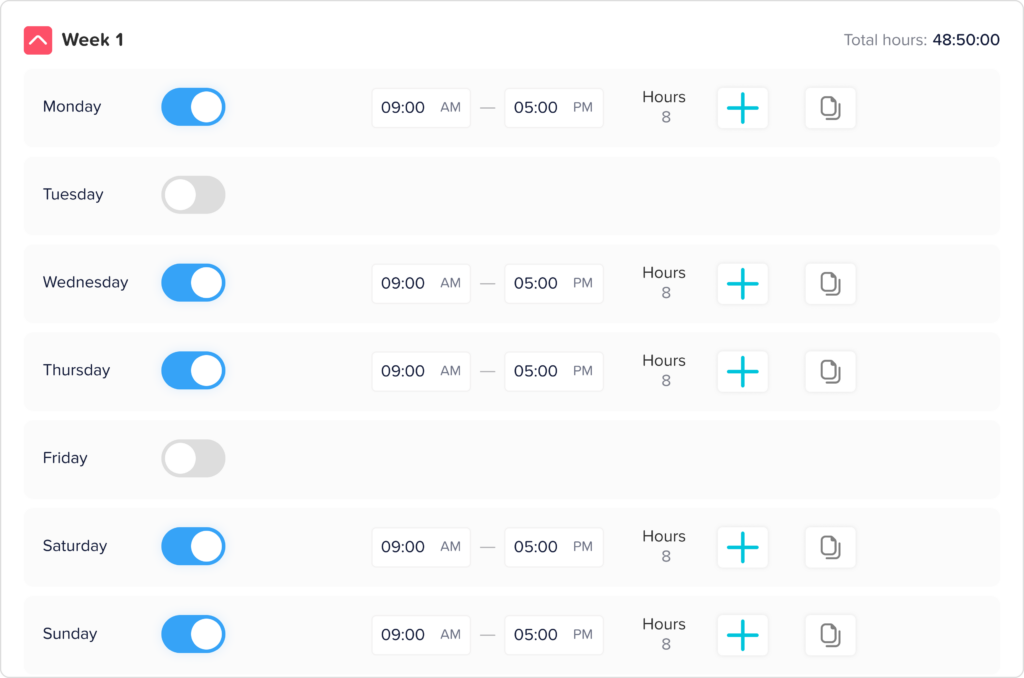
    Day Off app feature showing employee leave tracking, PTO management and absence scheduling – Day OffDay Off
    • Go to Settings.
    • Click on Work Schedule.
    • You can either:
      • Edit the default work schedule, or
      • Click Add Work Schedule to create a new one.
    • Configure the schedule:
      • Working Days: Select the days your company operates (e.g., Monday to Friday).
      • Weekends: These will automatically be excluded based on your selection.
    • Save the work schedule.

    Schedule Type

    You can choose the type of schedule:

    • Fixed Hours
      Define the number of working hours for each day.
      Employees are expected to complete these hours, without specifying exact start and end times.
    • Flexible Hours (currently selected)
      Define the start time and end time for each working day.
      This allows flexibility while still setting boundaries for when employees can work.
    • Rotating Shifts
      Shifts are assigned based on a rotation pattern (e.g., morning, evening, night shifts).

    Tips:

    • If your company has different working patterns (e.g., shifts or regional teams), create multiple work schedules.
    • Make sure the correct schedule is assigned before employees start requesting leave to avoid incorrect calculations.

    Final Checklist

    Before rolling out Day Off to your team, review the following to ensure everything is set up correctly:

    1. Leave Types

    Ensure all required leave types (e.g., annual leave, sick leave, unpaid leave) have been created.

    Each leave type should be properly configured with:

    • Balance units (days or hours)
    • Reset cycles (e.g., yearly)
      This ensures accurate tracking of employee leave requests.

    2. Leave Policies

    Verify that policies:

    • Include the correct leave types
    • Match your company’s rules and entitlements
    • Reflect differences between employee groups (e.g., full-time vs part-time)

    This helps maintain fairness and consistency across your organization.

    3. Locations & Holidays

    Confirm that:

    • All company locations are set up
    • Holiday calendars are accurate for each location

    This prevents employees from being charged leave on official holidays and ensures regional accuracy.

    4. Employees

    Make sure all employees are added with complete and correct details, including:

    • Role
    • Team
    • Location
    • Leave policy

    Proper setup here simplifies management, reporting, and approvals.

    5. Teams / Departments

    Check that employees are grouped into the correct teams or departments.

    This improves:

    • Approval workflows
    • Policy assignment
    • Overall visibility within the system

    6. Work Schedules

    Ensure each employee or team has the appropriate work schedule assigned.

    This is essential for:

    • Accurate leave deductions
    • Correct working day calculations
    • Supporting different work patterns (e.g., shifts, flexible hours)

    You’re All Set

    Your Day Off workspace is now fully configured and ready to support your team.

    By completing this setup, you’ve established a clear and reliable system that will help you:

    • Track leave accurately without manual intervention
    • Automate approval workflows and reduce administrative overhead
    • Ensure fairness and consistency across all employees
    • Improve visibility into team availability and planning

    As your organization evolves, you can easily update these settings, whether it’s adding new leave types, adjusting policies, or restructuring teams, to keep everything aligned with your needs.

  • What are Leave Types in Day Off?

    Leave types in Day Off represent the different categories of time off that employees can request and track within the system. Each leave type is designed to reflect a specific purpose for absence and can be configured with its own rules, balances, and approval workflows.

    Day Off app feature showing employee leave tracking, PTO management and absence scheduling – Day OffDay Off

    Why are leave types important?

    Leave types are essential for organizing and managing time off in a clear, structured way. They ensure that every request is handled according to the right policy and that both employees and administrators have full visibility into how time off is used.

    With well-defined leave types, you can:

    • Understand time off patterns across teams and the entire organization
    • Apply the correct policies automatically for each type of leave
    • Accurately track balances and entitlements without manual effort
    • Route requests through the right approval workflows
    • Maintain reliable records for HR, payroll, and compliance purposes

    In short, leave types bring clarity, consistency, and control to your leave management process.

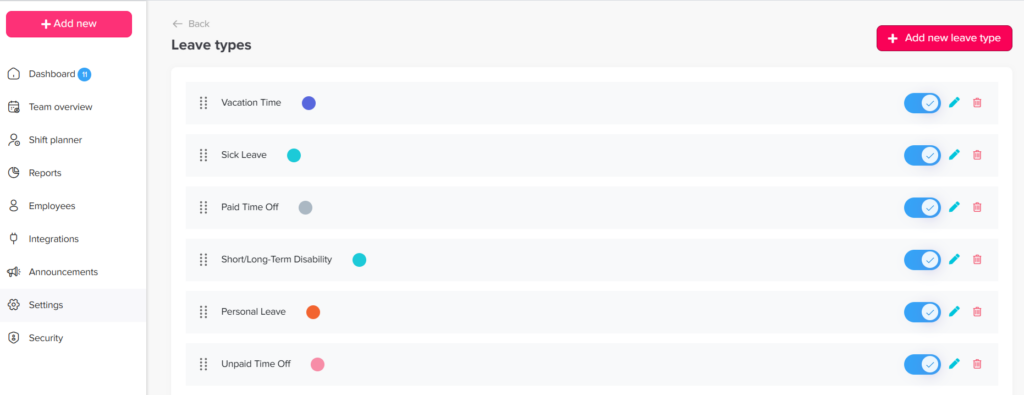
    Examples of leave types in Day Off

    Day Off is designed to be fully flexible, there is no fixed list of leave types. You can create and name leave types based on your organization’s policies, terminology, and operational needs.
    To get started, here are some commonly used examples:

    Day Off app feature showing employee leave tracking, PTO management and absence scheduling – Day OffDay Off

    Annual Leave

    Paid time off that employees can use for vacations, personal plans, or general rest. It is typically accrued over time and may follow yearly entitlement rules.

    Sick Leave

    Time off taken when an employee is unwell or needs medical care. Depending on company policy, this may include doctor visits, recovery time, or required documentation.


    Unpaid Leave

    Leave taken without salary when no paid leave balance is available or when the situation falls outside standard paid leave policies.

    Maternity and Paternity Leave

    Time off granted to employees for childbirth and early childcare. The duration and conditions are usually defined by company policy and local labor laws.

    Emergency Leave

    Short notice leave for unexpected or urgent situations, such as family emergencies or critical personal matters.

    Compensatory Leave (Comp Off)

    Time off awarded to employees in exchange for working extra hours, weekends, or official holidays, helping balance additional workload.

    Public Holidays

    Predefined company or national holidays that are automatically applied to employees’ calendars and typically do not require a request.

    Important

    These are examples, not limitations. Day Off allows you to fully customize leave types, including their names, rules, and balances, to match your organization’s policies.

    You can also control how each leave type is approved: whether it requires manager approval or is approved automatically, depending on how you want requests to be handled.

  • How to join my company?

    To join your company on Day Off, you need to be added by your company admin or HR manager. Once you’re added, you’ll receive your login details, including a username and a temporary password for your first access. or you may be asked to log in using your company’s system (SSO or custom domain).

    First Time Login

    Day Off app feature showing employee leave tracking, PTO management and absence scheduling – Day OffDay Off

    Follow these steps to access your account for the first time:

    • Open Day Off
      Download the Day Off app (Android or iOS), or use the web version.

    • Go to Login
      Click on the “Log In” button.

    • Enter Your Login Details
      Use the same email or phone number your company used to invite you.

    • Enter Your Temporary Password
      Type the temporary password you received. For security reasons, you will be asked to set a new password.

    • Click “Log In”
      You’ll be signed in and taken to your account.

    What if My Company Uses SSO?

    If your company uses Single Sign-On (SSO), you won’t need a temporary password to log in.

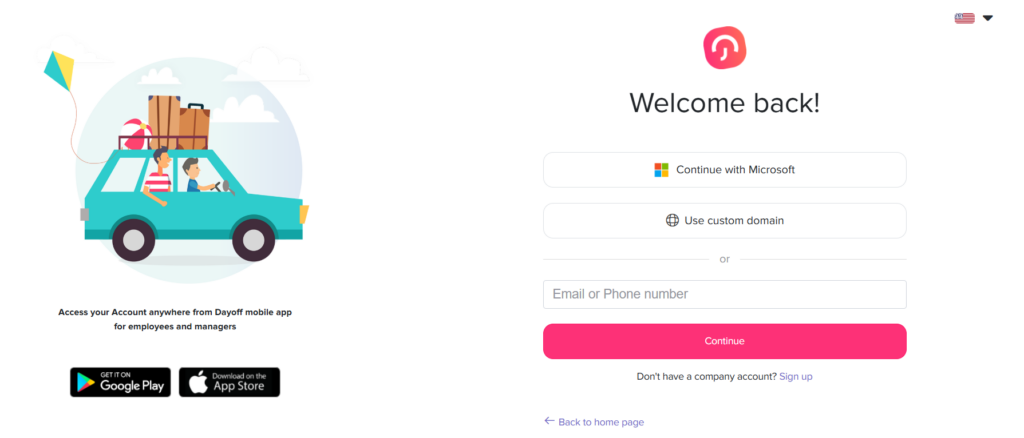
    Instead, your company will provide you with a login method that connects Day Off to your organization’s system (such as Microsoft).

    How to Log In with SSO

    • Open Day Off (web or mobile app)

    • Click “Log In”

    • Choose the SSO option (e.g., “Continue with Microsoft”)

    • Sign in using your company credentials

    Once authenticated, you’ll be logged in automatically and linked to your company workspace.

    Important Notes

    • You must use the same email associated with your company account

    • Access is managed by your organization’s system, not a separate password

    • If you have trouble logging in, contact your IT team or admin

    What if My Company Uses a Custom Domain?

    If your company uses a custom domain, you’ll log in using your organization’s specific domain instead of a standard email/password or SSO option.

    Day Off app feature showing employee leave tracking, PTO management and absence scheduling – Day OffDay Off

    How to Log In with a Custom Domain

    • Open the Day Off login page

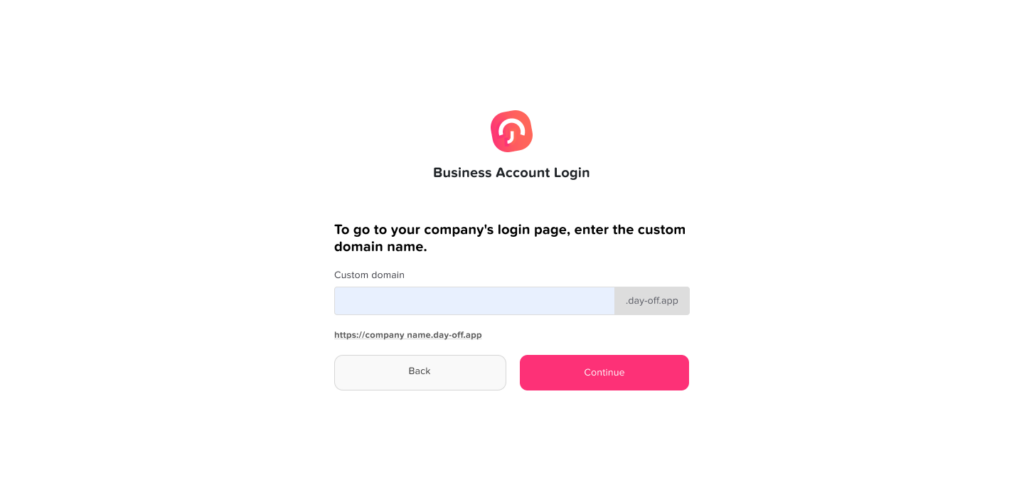
    • Click “Use custom domain

    • Enter your company’s domain (for example: yourcompany.day-off.app)

    • Continue to your company’s login page

    • Enter your login credentials

    Once completed, you’ll be signed in and connected to your company workspace.

    Important Notes

    • Your company must provide you with the correct domain

    • The login method may vary depending on your company’s setup

    • If you’re unsure about your domain, contact your admin or IT team

    Once logged in, you’ll be able to:

    • View your available leave balance at any time

    • Submit and track your time off requests

    • Check your team’s schedule to see who is off and plan accordingly

    Joining your company on Day Off is a simple process that depends on how your organization manages access. Whether you log in using a temporary password, SSO, or a custom domain, once you’re in, you’ll have everything you need to manage your time off and stay aligned with your team.

  • How to create a company account?

    Creating a company account on Day Off is a straightforward process. Each step is designed to collect the basic information needed to set up your workspace correctly from the start.

    Step 1: Open the Registration Page

    Day Off app feature showing employee leave tracking, PTO management and absence scheduling – Day OffDay Off

    Go to: https://tracker.day-off.app/auth/register

    This page contains the account creation form. It’s where you’ll enter all the necessary details to set up your company account.

    Step 2: Enter Your Account Information

    You’ll be asked to provide three key details:

    • Email: This will be your login credential and the main way the system communicates with you. It’s best to use your work email.

    • Company name: This creates your workspace and is what your team will see when they join.

    • Full name: This identifies you as the account owner (admin) inside the system.

    These details form the foundation of your account and cannot be skipped.

    Step 3: Select Your Location Settings

    In this step, you define your company’s regional settings:

    • Country: Helps tailor certain defaults (such as holidays or regional formats).

    • Time zone: Ensures that all leave requests, approvals, and calendar events are recorded at the correct local time.

    Choosing the correct time zone is especially important for teams working across different regions.

    Step 4: Set Your Password

    You’ll need to:

    • Enter a password

    • Confirm the same password

    This password secures your account. Make sure it’s strong enough to protect your data, but still something you can remember.

    Step 5: Agree to the Terms and Conditions

    Before continuing, you must check the box to accept the Terms and Conditions.

    This step confirms that you agree to the platform’s usage policies and is required to proceed with account creation. Then click the Sign up button to submit your information.

    Step 6: Choose a Plan

    The first step on the welcome page is selecting a plan that fits your team.

    You’ll typically see two options:

    Free Plan

    The free plan allows you to get started with basic features. It usually includes:

    • A limited number of employees

    • Basic approval workflow

    • Standard leave policies

    • Access to reports

    This option is suitable for smaller teams or for trying out the system.

    Pro Plan

    The Pro plan includes more advanced features and fewer limitations, such as:

    • Support for more or unlimited employees

    • Additional team management options

    • More advanced tracking features (such as accruals or carryover)

    • Expanded calendar and reporting capabilities

    You can start with a free trial and upgrade later if needed.

    Choosing a plan doesn’t lock you in permanently. It simply defines how your workspace will be set up initially. You can usually change or upgrade your plan later as your team grows or your needs change.

    Step 7: Set Company Working Days

    Day Off app feature showing employee leave tracking, PTO management and absence scheduling – Day OffDay Off

    You can select which days are considered working days and which are not (for example, weekends). You also choose when your work week starts and how dates are displayed.

    There is also an option to enable an advanced work schedule if your company has more specific or flexible working patterns.

    This setup ensures that leave requests and calendars are calculated correctly based on your company’s actual working days.

    Step 8: Balance Reset Settings

    Day Off app feature showing employee leave tracking, PTO management and absence scheduling – Day OffDay Off

    You can choose a reset period (such as at the beginning of the year) or allow balances to reset based on each employee’s work anniversary. This determines when leave days are renewed.

    You can also import official holidays, which will be automatically considered when calculating leave and availability.

    These settings ensure that leave balances are updated correctly and follow your company’s policies throughout the year.

    Step 9: Customize Company Leave Types

    Day Off app feature showing employee leave tracking, PTO management and absence scheduling – Day OffDay Off

    In this step, you define the types of leave your company offers, such as vacation, sick leave, or paid time off.

    You can review the default leave types, adjust their settings (like the number of days per year), or add new ones based on your company’s policies. Each leave type can be enabled, edited, or removed as needed.

    This setup ensures that employees request the correct type of leave and that balances are tracked accurately for each category.

    Step 10: Invite Your Employees

    Day Off app feature showing employee leave tracking, PTO management and absence scheduling – Day OffDay Off

    Your account setup is now complete and your workspace is ready to use.

    At this stage, you can start by inviting your employees to join the system. Once they’re added, they’ll be able to access Day Off, submit leave requests, and view their schedules.

    You can choose to invite your team immediately or skip this step and do it later.

    Employees can access the platform through the web or mobile apps, making it easy to manage time off from anywhere.

    By following these steps, you create and configure your company account from start to finish. Once completed, your workspace is fully set up, and your team can begin managing time off in a clear and organized way.

  • What is Day Off?

    Day Off is a modern leave management tool that helps teams request, track, and manage time off effortlessly, all in one place. Whether you’re running a small startup or managing a growing team, it brings clarity and structure to something that’s often messy and time consuming.

    Understanding Day Off

    At a basic level, Day Off helps teams handle three main parts of leave management:

    • Requesting time off

    • Approving or declining requests

    • Keeping track of leave balances and schedules

    Instead of relying on manual processes, everything is recorded and updated automatically within the system.

    How Day Off is Used

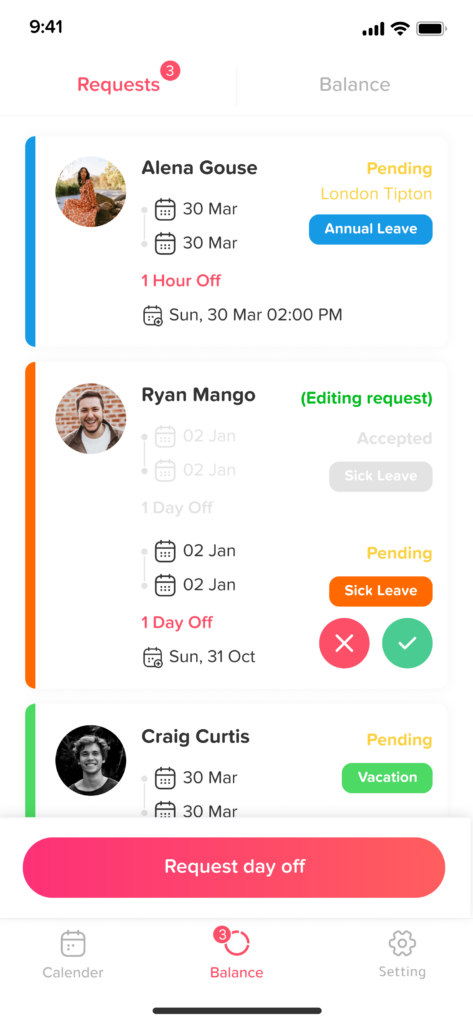
    Employees use Day Off to submit requests for different types of leave, such as vacation or sick days. These requests are then reviewed by managers, who can approve or reject them.

    Once a request is approved, it is reflected in the system so both employees and managers can see updated schedules and remaining leave balances.

    Key Features of Day Off

    Easy Time Off Requests

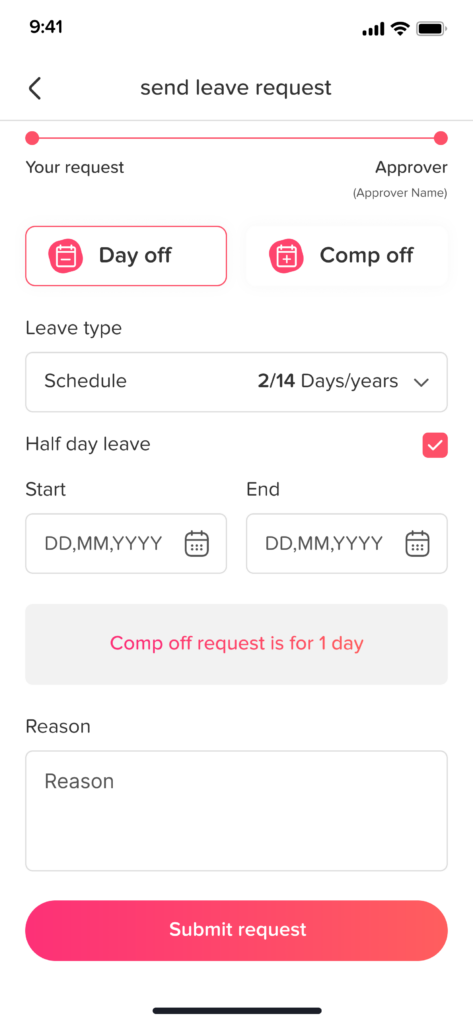
    Requesting time off is straightforward and quick. Employees can choose their dates and submit a request in just a few steps, without relying on forms or lengthy email threads.
    Structured Approval Process

    Managers receive requests with the necessary context, making it easier to review them and respond in a timely and consistent way.

    Clear Leave Balances

    Each employee has a clear view of their remaining leave, helping them plan ahead without needing to check manually or contact HR.

    Shared Team Calendar

    A centralized calendar shows who is off and when, giving teams better visibility and helping them coordinate work without conflicts.
    Access Across Devices

    Day Off can be accessed from both web and mobile, allowing users to manage requests and check updates wherever they are.
    Who Should Use Day Off?

    Day Off dashboard displaying employee leave balances, upcoming absences and PTO overview for team managers – Day OffDay Off

    Day Off is designed to support teams of all sizes, from small startups to large organizations. It adapts easily to different structures and workflows, making it useful across a wide range of industries.

    It is especially helpful for:

    • Startups that want to stay organized as they grow and avoid messy, manual processes

    • Small and medium-sized businesses looking for a simple way to manage employee leave without added complexity

    • Large organizations that need a clear and consistent system to handle time off across multiple teams or departments

    • HR teams responsible for tracking, approving, and reporting on employee leave

    • Remote and distributed teams that rely on shared visibility and clear coordination

    By providing a centralized and transparent system, Day Off works well for any team that wants a more structured approach to managing time off.

    A Better Way to Manage Time Off

    Managing employee leave should be clear and straightforward for everyone involved.

    Day Off provides a structured way to handle requests, approvals, and leave tracking without relying on scattered or manual methods. Keeping everything in one place helps teams stay organized, reduces administrative effort, and ensures that information is always up to date.

    As a result, teams can plan more effectively and maintain better visibility into availability, without unnecessary complexity.